Monday, March 16, 2020

I was cleaning up my sewing room earlier today and came across a few "orphan" blocks from another project.  Normally I toss these blocks into what I call Area 51.  That place where all UFO's land.  


Instead of adding to the overflowing pile, I decided to make a runner for my new kitchen using the Perfect Rectangle Ruler.  This ruler is excellent for turning ho-hum blocks into interesting shapes.
First, I had to enlarge the blocks to a more suitable size.  I suggest a 12" finished block for this project.  I added white triangles to set the blocks on point.  Here's a tip:  Clean your iron before sewing with white fabric!  I wish I had ; )


To fit a 12" finished block you will need Perfect Rectangles cut from a 6 1/2" strip of the background fabric in your block and another set cut from fabric for the outer edge of the runner.  The fabric should be folded, the way it came off the bolt, so that you are cutting 2 pieces at the same time.  Those pieces will be mirror imaged.  Make the first cut, rotate the ruler and make the second cut.  Don't forget to trim those tiny clipped corners.  You will be happy you did when you stitch these pieces together.


Once you have the pieces cut from both the background fabric and the fabric for the outer edge, stitch the triangles into Perfect Rectangles.  Then stitch those units together, matching the ends that are background fabric. Make 12 units.


Stitch these to the top and bottom edge of your center block.
Remember, the center block can be ANY 12" finished quilt block
or even a single square of beautiful fabric.


Now add border fabric squares to each end of the remaining units.

Stitch these to the right and left side of the center blocks.


Make three of these and stitch them together end to end.


I added nice wide borders to my runner, because I plan to put it on the longarm 
and practice some fancy quilting with rulers, just for fun.

It's going to look great in the pantry area of our new kitchen remodel. 
But first I need the countertops!


If you would like a .pdf of the step-by-step instructions for this runner, 
drop me an email me at:


Put "Any 12" in the subject line and I will send them to you.


Monday, March 9, 2020

Where Ya' Been Karen?

     The last six months have been crazy busy, especially considering I am a "retired" person.  In reality, I only retired from owning a retail quilt shop.  I still have a wholesale book and pattern company.  I host a yearly retreat for quilt shop owners from across the U.S and Canada called Sewposium.  I also design rulers for Creative Grids and this spring I have my name on a fabric group from In The Beginning Fabrics.  Why retire when you love your job?

     Any one of those responsibilities can be all consuming.  Together, they keep my sewing room in a constant state of total craziness - and I love every minute of it.  However, I do hope that the last few months will not become the norm.  I've done nothing but chase one deadline after another.  

The Glamour of it All

     The Crazy part started when Creative Grids released my newest set of templates at Fall Market in October.  To release a Creative Grids product the designers are required to have companion patterns ready for sale.  No problem.  BUT these fun new Crazier Eights templates are capable of SO MUCH more!  I knew that I had to write a book!

You won't believe what these 5 crazy shapes can do!
You can purchase both the book and the templates in my Etsy shop:


Making the quilts for the book is easily the best part of the project and incredibly fun!  

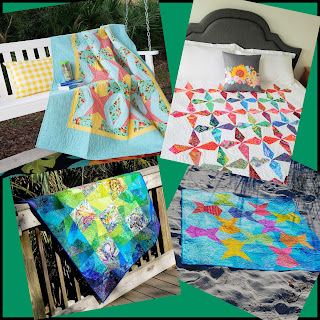
     My line of Scrap Crazy templates (there are 3 different sets) are designed to help you use up scrap fabrics, leftovers or even yardage.  My sewing room floor was littered with piles of fabrics, sorted by color, type or style for several months.  It was a glorious mess!  But look at some of the results!


The book has instructions for 8 projects, from table runners to bed size quilts.
.
Once the quilts are pieced, quilted and bound, the really hard work begins.
Writing instructions, proofing instructions, drawing all the diagrams and then laying out the pages.


The real challenge for this project was getting the photos taken.  
Between closing the store and finishing the book, we moved from 
Pennsylvania to Florida.  
I left behind a great group of quilting friends, but I also left a well crafted 
group of professionals that understood my work.  
In this case, I was missing my photographer.


For instruction purposes, the quilts must be photographed flat and square.

That is best achieved with a good solid surface, a tripod, special lighting,
and the technical expertise of a pro.
After a few unfortunate attempts to find someone that understood that these 
were technical photos and not style shots I became.... 

Honestly, with a deadline looming I started to PANIC!

My husband - simply said "We can do this".
"This" required a suitable flat surface in a well lit area.
One that could be pinned to or have a quilt spread out,
 flat on a vertical surface.  Due to high ceilings and very high up,
 south facing windows, this new house simply doesn't have 
an uninterrupted wall large enough 
where we can control the lighting.  
We learned that lesson filming the product video!

You can watch the edited version of the video here:

Coincidently, I had just ordered a king size headboard for our guestroom.  
That required dismantling the bed to attach 
the new headboard to the base frame.
My can-do husband had an idea!  
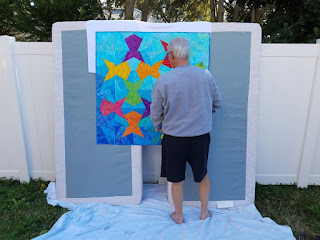
He carried the box springs from the king size bed 
downstairs and out into the backyard.  
Those were placed on a clean sheet and leaned against the privacy fence. 
 A heavy towel was placed over the space between them 
so that sunlight didn't filter through.
Using nothing fancier than the camera in my cell phone, 
we began a photoshoot that still has our neighbors scratching their heads.


We got it done!
  He was right.  It wasn't a fancy studio shoot, but it worked.  
I learned some new photo editing skills and was able 
to meet my publishing deadline, 
just in the nick of time.

Now the book is back from the printer and ready for you to enjoy!

Me, I'm going to get to work on a SECOND book 
using this same set of templates because there are
 even MORE great things you can do with them!  

If you have made something with the Crazier Eights template set
Don't be shy, show me your stuff!


Tuesday, March 3, 2020

Hello!

     I am the author of the Brown Bag Mystery.   The BBM participants have some questions about how to use the Perfect Rectangle Ruler, so I thought I would offer some visual help here on my woefully neglected blog.  If you are unfamiliar with the Brown Bag Mystery - it's tons of fun! You purchase a bag of fabric from a participating shop, join a private online group and share your progress as the clues are delivered.  If you want to play along, leave a comment below and I will put you in touch with the participating shops.

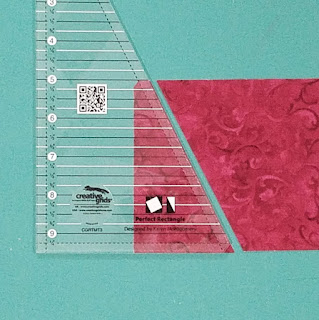
     The Perfect Rectangle Ruler makes it easy to create Half Square Rectangles.  What makes the piece "perfect" is that the finished base measurement is one half the height.  That means that 2 half square rectangles or 4 individual pieces sewn together will make a square.

Cut your fabric strips to the desired size. For this demo the strip is 4 1/2".  
Brown Bag Mystery participants should make sure that all of the fabric strips are RIGHT SIDE UP.


Use any ruler to clean up one end of the strip to create a perfect 90 degree corner.


Place the 4 1/2" line on the base of the fabric strip and the left side against the trimmed edge.
Cut the right side and the tiny clipped corner on the upper left.
That tiny clip is important!


Before moving to the next cut, slide the ruler up and align the base 
and right edge of the ruler with the fabric piece.
Trim the bottom right corner clip.


Rotate the ruler 180 degrees to make the next cut.
Creative Grids Rulers have a non-slip grip on the bottom of the ruler.
You ALWAYS rotate the ruler.  You will NEVER use the ruler upside down.
.... except for the Quick Trim and Circle Ruler, but that's a different demo ; )


Repeat the process, trimming both corner clips, top and bottom on each cut.


When you stitch the Perfect Rectangles together, they will line up.... well... perfectly!


Try that without corner clips!

Brown Bag Mystery participants should NOT sew these together until told to do so!

Just an FYI.....
The Perfect Rectangle Ruler is the companion ruler to the Triangle In A Square Ruler
CGRTMT2
These two rulers combine to make the triangle that fits inside a square.


It's all in having the right tools!