Saturday, February 13, 2021

Makin' it Easy

    Everyone loves to get something for free.  That is why fabric companies offer a free pattern for almost every fabric line produced.  Simply visit their website and download the instructions at absolutely no cost to you.  Then hopefully you will buy the featured line of fabric and put that free pattern to use.  

    A free pattern is not a gift, it is a sales tool.  I fall strictly on the side of "You get what you pay for" in the free pattern discussion.  I frequently warn people to look closely before beginning one of those projects.  If the image of the quilt was created digitally, as in on the computer, beware.  I can draw lots of designs on my laptop that you would go crazy trying to sew.  It is entirely possible that the free pattern you snagged off the internet was created by someone that doesn't even sew.  Reputable companies have technical editors that write and/or review the instructions before offering them to the public.  It is still a good idea to look things over before you get too deep into a project.

    Take the Whimsy Daisical line from Blank Quilting, the free pattern on their website is adorable.  You can download the pattern here: whimsy-daisical-quilt. I have some leftover fabric from the Straight Out Of Line quilt, so I decided to check out the pattern and see if I could make a fun summer table runner using just three of the blocks in the quilt.

    I printed the pattern and did a quick read through of the materials and the instructions.  The first thing I noticed is that the materials list includes paper backed fusible web to bond the melon shapes to the background squares.  The list doesn't tell you how much you will need, it just says you need it.  That makes sense because the fabric company doesn't promote a specific brand of fusible, so they don't know how wide the one you choose will be.  Remember, these instructions are free,

    Those flower shapes made from the melons are surrounded by half square rectangles.  The instructions tell you to foundation paper piece those.  Simply make 48 copies of the foundation page.  For this project that method is easy to write and doesn't require a special tool, once again, free pattern.

    I'm a big proponent of having the right tool for the job, so I filmed a video showing how you would make those units using their method, and how you can make them using the right tool.  The tool is the Perfect Rectangle Ruler that I designed for Creative Grids.  Faster, easier, less waste, and no bias edges. You can watch the video on YouTube by clicking here: Half Square Rectangles.

    As long as I was set up, I filmed another video about the fusible process for the melon shapes.  I made a table runner, but the full size quilt requires 48 of the melons.  The instructions are basic, they tell you to trace the pattern on to the paper side of the fusible web.  What are the odds that you can trace 48 identical shapes?  Me too.  In the video you will see how easy it is to make a template.  Click here to watch the Fusible Applique video.

    I finished the series with the Machine Applique to discuss the difference between a machine zig-zag and a satin stitch.  The pattern suggests a zig-zag with a monofilament thread.  Most of us refer to it as "invisible".  There is nothing wrong with those instructions.  If I have to stitch around an applique, I prefer that the stitching shows.  I chose a tiny machine blanket stitch for my melon shapes.  I also used a fuchsia embroidery thread, just for fun.

    I made a few changes to the block to create my runner.  The center section measures 12".  The half square rectangles add another 6".  The block, without the sashing used in the quilt pattern, measures 18".  That is plenty wide enough for my kitchen island, so I omitted the sashing and stitched the segments together without sashing.
    That made it very important that the melons meet in the center.  I was glad that I had used the blanket stitch and not a heavy satin stitch.  The corners are bulky enough without all that added thread.  If you give this a try and aren't happy with that intersection, add a fun button to look like a flower center.  I had some purple ones on hand, just in case! 


I joined the three large blocks side-by-side, once again omitting the narrow sashing.  Then there was nothing left but quilting and binding.  I have a Handi Quilter with a ProStitcher so quilting wasn't a problem.  I selected an all over daisy pattern that came programmed into the machine.  The backing is white, because my counter top is white.  I didn't want to put a print on the back and risk having it shadow through the white background in the blocks.  The binding is a sold yellow/orange that came from my vast fabric stash.  Here is a photo of the runner on my island.  Not exactly a Valentine theme, but it adds a little pink to my kitchen for the holiday this weekend. Happy Valentine's Day to all of you!  
Enjoy!

Monday, February 8, 2021


    Have you ever been "in the zone" when you are quilting?  Your rotary blade is sharp, your points match, your pieces are square and flat when pressed.  Your thread lasts until the end of the seam and everyone in your household allows you the time to simply create.  Best of all, you love what you are working on.  Ahhh.... Total enjoyment.  That describes the last five days in my sewing room.  It has been absolute bliss.  I hate to even mention how well things are going and risk of conjuring up the wrath of broken needles, dull blades and seams that don't match up.


     In anticipation of a package of sample fabric from Jaftex, I started to play with a Creative Grid's ruler called Straight Out Of Line.  This isn't a new ruler.    Karla Alexander of  Saginaw Street Quilt Company designed this ruler several years ago.  I just decided that now was the perfect time to play with it and see what happens.  After all, not all of the really cool tools are brand new on the market.  I think we have all rushed to buy a "hot" new item only to have it fizzle.

     You may be looking at the simple shape of this ruler and thinking "Do I really need a ruler to do that angle line"?  The answer is absolutely not.  You don't "need" a ruler to make these blocks.  If you like your seams to match and your pieces to lay flat and your quilting process to be enjoyable, then you probably "want" the proper tool to do the job.  This one is also simply fun to play with. 
 
     First things first when playing with a new tool, you should read and follow the directions.  I know, that is a hard one for me too.  I generally like to jump way ahead in the design process. I trust Karla, so I decided to watch the video for this ruler on the Creative Grids website.  If you watch the video by going to the website instead of YouTube, scroll down to see the quilt patterns that Karla has available to use with this ruler.  

     My first thought was to grab some fabric!  It can't be that easy... but it is.  A few hours later this small top was together and on my design wall.  It is a funky four patch, one of the basic things you can make.  Super easy.  I used twelve 10" squares from a Tula Pink fabric pack.  The most difficult part is keeping track of where the 90 degree outside corners are on the cut pieces.  I solved that problem by making a paper pattern of the shape to help me stay organized.


     I still had squares of that Tula fabric leftover, so I decided to see what would happen if I cut half of them right side up and half of them right side down.  Adding twelve blue squares cut from yardage to the mix gave me not only a larger quilt top, but it also accentuates the checkerboard pattern.  Notice how in the first quilt only the center seams of the blocks match.  In this quilt all of the seams line-up.  Karla shows how to flip the ruler over to get the mirror image cuts in the video.  I prefer to simply flip the fabric over.  It works either way.

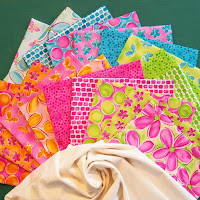
     My head was filled with ideas when FedEx delivered the package of Whimsy Daisical fabrics from Blank Quilting.  All these funky fun colors to play with!  If these prints don't spark joy in your life and make you smile, you might need to seek professional help.  

     Enough of following Karla's lead, it was time to have some fun of my own with the Straight Out Of Line ruler!  I have a huge bin of fabric scraps that could be labeled "It was a good idea at the time".  Most of  my "good ideas" start out as "I wonder if this will work" ideas.  Some do, some don't.  I took the time to play with scrap fabrics, sizes and color placement before cutting into the sample yardage from Blank.  You should never be afraid to make a test block - or two - or three so see if things are going to look the way you want, even if you are working with a published pattern.  

     After a bit of experimenting with size, I decided to cut half of the blocks at 10" and half of the blocks at 8".  Then I added a narrow border of white to make the smaller blocks measure 10" before cutting them with Karla's ruler.  Ten inches is the largest size square you can use with The Straight Out Of Line ruler, but it also includes the lines to use squares as small as 4 inches.  It would be fun to use this ruler to cut up a charm pack.  

     I cut all of my squares for the quilt, making the first cut face up and the second cut with the fabric face down.  Did you notice that gave me two different shapes?  The blocks in the first two quilts have four identical shapes.  The blocks for the Whimsy quilt have 2 different shapes.  This is not my discovery, those instructions come with the ruler.  I just added the blocks with the border to the mix.

     Look how much fun I had with this quilt!  You can look at these blocks for a long time and see different things.  I like the way it looks as if the background blocks are fractured.  Do you see butterfly wings?  Maybe you see kites?  Know what?  Those thin white borders lined up from block-to-block every single time.  Every.  Single.  Time.  That folks is what having the right tool for the job can do for you.  

     If you love this fabric line, it will be available in a quilt shop near you in the next few weeks.  If you would like to see something else  - totally different - using these same fabrics, check out the free pattern from Blank by clicking on the Whimsy Daiscal link above.  Then check back here later and I will show you how to make that free download quilt using the proper tools to make the job much easier.  Meanwhile - keep sewing!