Tuesday, December 22, 2020

Working On The Chain Gang


     Now that the Abby's Treasures blocks are complete it is time to put them together with some scrappy sashing.  I had the idea for a scrappy sashing from the very beginning so as I pressed and cut the fat quarters of fabric I went ahead and cut strips into 2 1/2" squares.  Piles and piles of squares.


     I spent a good part of my weekend chain piecing squares into random groups of six so that each strip would fit the 12" blocks.  The plan was to add a random fabric square as the cornerstone as I  stitched the sashing strips together with the blocks.


       Ta-da!  All cut, sewn and pressed.  One small problem.... I didn't like the single row of sashing.  Too many 2" squares in the sashing and in the block.  Not enough interest. I also thought a single row of sashing looked.... wimpy.  So I doubled it.  Two rows of sashing blocks gave the quilt the random scrappy look that I was after, but 4 inches of sashing was just too wide.  So I cut them down!  I used the 3 1/2" by 12 1/2" Quick Trim & Circle Ruler.  I placed the center line on the ruler on the center seam of the strip set and cut 1/2" off each side.  Instant 3" sashing made with rectangles!  Well "instant" in the same way that someone becomes an "overnight" success.  I had to make twice as many of the sashing strips and then cut them down.

     
     I also decided on a random square of background fabric for the cornerstones in the sashing, adding more light fabric to the quilt.  I am pleased with the secondary pattern, the square around the cornerstone, that the sashing forms.  Looking good!

     Now the top is hanging on my design wall while I contemplate borders.  I could call it a day and simply quilt and bind the top at this stage, but right now, at this very minute, I really feel that this quilt deserves a nice border.  I may change my mind after living with it for a few days.  "Done" is a pretty good feeling.  

     So far I have followed the Jaftex Brand Ambassador "rules" and used the fabrics they provided.  Adding a border might make me go rogue.  One thing I do know, if it gets a border the first thing I will add is a narrow black border to really make those fabrics pop.  After that.... who knows?  Stay tuned!


Sunday, December 6, 2020

FILL IN THE BLANK

 Abby's Treasures, Part 2.

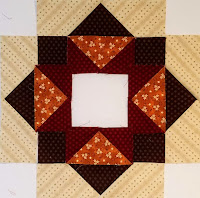
     My block frames are ready!  The next step is to decide how to fill the center of the blocks.  Another Flying Geese unit fits perfectly between the corner squares.  That is a very easy decision, but it does leave two options.  The geese can point out toward the edge or in toward the center.  One arrangement gives the block a square-in-a-square look.  The other creates a star in the center.  Who doesn't love a star block?  The problem is, you can't see the star if the fabrics don't provide enough contrast.  Time to rethink the plan.


     To make this quilt really scrappy, the sashing between the blocks is going to include all of the main fabrics.  I have set one fabric aside, a diagonal green stripe, for binding. Three of the 24 prints are being used in the background along with the piece from Denim & Dirt.  That leaves 20 prints, most of which are on the darker side to be used in the blocks and sashing.  That's a pretty dark color pallet.  I need to work more light background into the design to lighten this quilt up and show off the pretty prints.
     Clipping the corners with a background print should do the trick.  It lightens up the block and allows the fabrics to shine.  It also means that the best position for the geese is pointing toward the outer edge.  Turning them around would make the background fabric the star points and after adding a darker center, it wouldn't look like a star.  Sometimes decisions are made for you in the design process.  One thing I do know, those clipped corners are accumulating!
     I sew these tiny triangles together along the longest side to create small half square triangles.  I'm not sure if I will use them in a project, but they make great thread bunnies as I am piecing.  I have been known to square them up and turn them into something useful.  Scroll down to the Saturday, April 11th post on this blog to see my Carpenters Star pillow made from corner clips.  Meanwhile I still have a 4" hole in the center of my block to fill....

     Decisions, decisions, decisions.  The original block design had a Four Patch in the center.  I wasn't happy with that because it looked like too many of the same size squares to me.  The scrappy fabric choice also presented a contrast problem.  I felt that I needed a more balanced design for the center unit.

     All of my units so far were based on a strip cut 2 1/2".  When I started I had cut several 2 1/2" strips from each of the 23 fat quarters (remember, one fabric was set aside for binding).  Assuming I would pair 2" finished squares with the 12" finished blocks as the sashing, I knew I would need LOTS of them.  For my second attempt at creating an interesting center unit, I made a simple Nine Patch block and used my 4 1/2" ruler to trim it on point.  Now we are getting somewhere!  That is definitely more interesting than a simple 4 Patch block.  But... all of the edges in that center square are on the bias.  

     A little bias, especially in the center of the block, never scared me.  However, I may be writing instructions for this project sometime in the future.  Consumers - meaning those of you reading this blog - tend to have an unrealistic fear of bias edges.  I could write the instructions to cut the pieces so that the edges of this unit were on the straight of grain, but that would wreak havoc with the direction of my stripe fabric.  Not to mention that the tiny side triangles measure about 1/2".  I'm not sure the design is worth the effort of cutting and piecing 1/2" triangles.  On to option #3.

     I constructed a second Nine Patch using my stacks of 2 1/2" squares.  To balance the color I repeated the triangle fabric in the center square.  The four corners match and the four side squares match, allowing me to use a stripe that would radiate or parallel the center square.  I trimmed that down using my 4 1/2" square ruler.  Future instructions will be easy to write using the actual measurements. 

     To be honest, there were several variations in all three of the options before I settled on the photos you see here.  Next to every new quilt pattern is a huge pile of fabric scraps that didn't work out, looked wrong, were the wrong size or scale, didn't match.... That explains why my trash bin looks like this:
    
      My blocks are almost complete!  I'm happy with the "light" areas that will soon be surrounded by dark.  The block centers are interesting without being difficult to piece.  There is enough organization of color to keep the quilt from looking scrambled.  I considered using the same fabric for all four of the outside corners, but the blocks have enough repetition.  Why not go scrap crazy with the sashing?  Stay tuned to see the sashing next week!

FOR MY NEXT TRICK...

      I have the pleasure of working with several fabric companies.  One of my favorites is the Jaftex corporation.  You may not know the corporate name, but you certainly know their brands, FreeSpirit, Henry Glass, Studio e, A.E. Nathan, 3 Wishes and Blank Textiles are all under the Jaftex umbrella.  As a designer, I like variety in my fabric selection and those labels offer everything from reproduction to ultra-modern prints.  When I was offered the opportunity to become a Brand Ambassador, my first reaction was to jump at the opportunity.  The downside was that you were required to work with only ONE of those companies for an entire year.  That posed a problem, as I said, I like variety.  I ended up agreeing to give it a try if I could work across their brands and mix things up a bit.  Shortly thereafter, my first package arrived.

     In the next 30 days I have to produce either one “large” or three “small” projects using the fabrics included in the package.  This is a little like being on the Food Channel program Chopped where you must use the ingredients in the basket.  The good news is, I am the only contestant and I have an entire month to finish the task.  I filmed an “unboxing” video and shared it in the Nine Patch A Day Group on Facebook  You are welcome to join that private group and watch it there.  

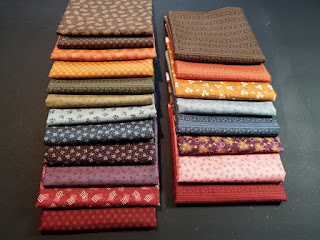
     Here is a photo of some of the fabrics I found in the package.  Half yard cuts of 24 pieces of the Abby’s Treasures fabric line by Missie Carpenter for Blank Quilting(You can read more about Missie by clicking the link) WHOO HOO!  I can work with this!  The package also included some light pieces not shown here and a huge piece of a what looks like aged muslin by Tana Mueller of Western Denim & Dirt to be used as background or backing.

     I thought it might be fun for you to follow the design process.  So here goes!

     The first thing I did was cut the fabrics in half on the fold to create fat quarters.  I may write instructions for this project in the future and I find it easier to track yardage by the fat quarter.   Next I sprayed all of the fabrics with sizing and iron them dry.  That is my method of pre-shrinking.  Working with the prints I realized that I had 6 different colors, blue, brown, green, red, orange and purple.  Twelve blocks, two from each color family is a sensible place to start.  The fabrics are also ALL blenders.  There is no feature print, like a larger scale floral, in the group.  This fabric line is perfect for a scrap quilt!  I chose these prints to be my main block borders.


     Next step, choose a block pattern.  It is always a good idea to start with a favorite.  Something not too simple, not too difficult.  For this project it must be interesting enough to include a variety of fabrics.  After all I have 24 different prints to work with.  I also have to choose carefully because SEVEN of the prints are stripes, both straight and diagonal.  One of the background fabrics is a diagonal stripe.  Time to cut that one up and find a pattern to make it work...  Wow!  That wasn't as difficult as I thought it would be.  Adding a cornerstone to this block keeps the diagonal stripe contained in a specific area.  Block pattern chosen!
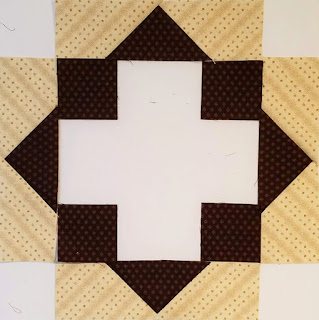
     You probably wouldn't start making a block by making the outer edge first, but in the design process I approach the pattern in a different way.  When making a scrappy quilt I like to provide some consistency,  I feel you need a place for your eye to "rest" and appreciate the design.  By cutting these geese units and the squares from the same fabric they will form a frame around the center of the block where a variety of fabrics will be used.  What the center of the block will look like is yet to be determined.  Right now I have to get twelve frames made using 4 different background fabrics.

   BTW, did you notice that the "goose" is inserted between two rectangles and not made with clipped corners?  There is no center seam in those dark triangles, courtesy of the magic of the Quick Trim & Circle Ruler.  The triangles were cut from a 2 1/2" strip using a Quarter Square Triangle Ruler.  The rectangles were cut and the corners clipped with the Quick Trim & Circle Ruler.  Neat trick to cut down on seams!
#BlankQuilting, #Jaftex, #The Quilt Company