Monday, July 26, 2021

Out of Sync


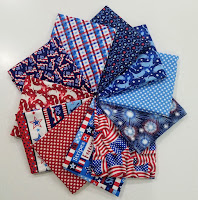
    When this fabric bundle arrived from Jaftex, I had to stop and think about the date.  I don't mean the number associated with that day.  It took a minute for the month and current season to register in my brain.  Working from home and living in the sunshine state can sometimes make you forget exactly what time of year it is.   

    This is the Stars and Stripes Forever group from Studio e.  It was delivered about 10 days AFTER the 4th of July.  Taking a page from the movie Groundhogs Day, I have spent the last week and a half "celebrating" the 4th of July. 


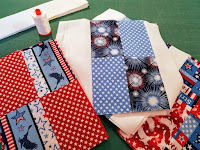
    Choosing a pattern wasn't difficult.  I have one in my files that I used for a Quilts of Valor project years ago.  The pattern makes a nice large quilt with a generous border and easy to piece blocks. I have never published the pattern, because it is SO easy.  After I enjoyed making this quilt, I think I will reconsider.  You should be able to have fun making this without the math calculations!

    The blocks go together super quick.  One other secret is that these blocks can easily be squared up to any size after you assemble them.  That was particularly helpful in the plan for the first quilt made from this pattern.  Those blocks were assembled by a few dozen of my oldest daughters friends.  Most of them had no sewing experience, but they wanted to make a quilt to support Quilts of Valor.  Once the blocks were returned to me, I trimmed them all to a uniform size.  I made all the blocks for this quilt, so the variations were minimal.  You don't have to square them up, but you can without changing the look of the pattern.


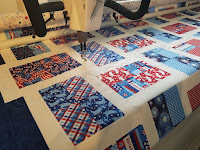
    Once the blocks were complete, it only took an afternoon to assemble the blocks into the quilt top and add the border.  Then it was ready for the longarm.  I chose a curved pattern for the quilting.  Stars just seemed like a obvious of a choice and I wanted something a little different.  

    I was thrilled with the speed of the progress on this project.... until I got to the binding.  Have you ever worked on a binding so long that you are absolutely sure the quilt has developed six or more sides?

     This binding is done by machine, but the quilt is large so it required nine binding strips sewn together end-to-end on a 45 degree angle.  Nine red and nine navy.  Then those were sewn together along the length.  The seam was pressed open and then all 360 inches of sew was pressed a second time to press it to one side.  Then the whole long length was pressed in half.  Once the binding was prepared it was stitched to the back of the quilt and pressed yet again to make sure that I was working with the full extension of the binding fabric.  Then I folded it over the raw edge and pinned it in place on the front of the quilt, mitering the corners.  Securing it in place required stitching around the entire quilt one more time on that little red flange to hold the binding in place.  Done and done.

    Now for some fun!  Time to take the style shots of the finished quilt.  This photo is of the quilt on the bed in our guest room.  It is nice having an "empty nest" where I can stage shots in our extra bedrooms without disturbing anyone.  I have also been known to bother the neighbors to get a good shot.  Knock, knock. "Can I borrow your front porch to take a photo of this quilt?"  

    Taking the photos sometimes feels a bit like cheating.  The quilt is twin size.  I have displayed it sideways on a king size bed.  I don't want to ruin the "magic" but I didn't make those pillows either.  The red/white/blue ones are just fabric from the Stars and Stripes Forever line wrapped and pinned around some Christmas pillows.  The larger red one has a giant jingle bell on the back!  A girls gotta do what a girls gotta do.

    One last item.  The Stars and Stripes Forever fabric group comes with two panels.  One is an American flag print and the other is this pennant design.  I took the no-sew approach to the pennant panel and fused Steam-a-Seam2 to the back of the triangles. Once they were fused, I rough cut them out and pressed the fabric onto a piece of cardstock.  Then I trimmed each one into the pennant shape.  The printed shape has an extension of about 1/2" at the top.  I placed the cardstock even with that line.  It gave me enough fabric to fold over the top and secure a length of ribbon using the Steam-a-Seam2 that was already on the fabric.  By adding a ribbon to each triangle, I can tie them together in groups to make the length I need.

    Here is a photo of a few of the finished pennants in my kitchen.  That bottom shelf usually holds floral print coffee mugs, but they clashed with the red/white/blue theme.  

    When I tie all seventeen of the pennants together I will have enough to decorate the pergola on our deck!  I might just do that.  Hang them up, toss the quilt over the table and set the scene for the 4th of July.  The neighbors won't blink an eye.  Oh... neighbors.... I wonder if the pennants would be long enough to stretch across Dan an Kristen's new pool?  We could stage an Olympic swimming shot!


Monday, July 19, 2021

Sometimes You Just Have To Sew

    One glance in my sewing room and it is absolutely obvious that the scrap situation is out of control.  Normally this would not be a problem because I consider myself primarily a scrap quilter.  Lately, or more accurately, for well over a year I have created plenty of quilts, but only a few were SCRAP quilts.  Even the quilts that may look scrappy, were created from new fabric lines, which only added to my scrap storage problem.  Something had to be done.

    I design the Scrap Crazy Template sets for Creative Grids.  There are three sets of templates available.  The original Scrap Crazy set and the Crazier Eights set both make an 8" finished block.  The third set creates a 6" finished block.  All three sets make a unique Crazy Patch block to help you use up your scraps in the most effective way possible.  Obviously I need to put mine to good use.

    Crazy Patch quilting is simple and fun to do, but without a plan you can find yourself in a situation that is referred to as "up the creek".  In order to continue adding pieces to your block, you will need a set-in seam or a Y-seam.  The Scrap Crazy template sets eliminate that issue because they are guaranteed to fit back together with simple straight line sewing.  Another bonus is that as you rotary cut, the dog-ears are pre-trimmed on the templates so that there is no doubt about the placement.  Simply line up the edges and sew!  Even better, the templates work in different combinations to make unique quilt patterns that probably wouldn't consider without a template.  These are just a few of the quilts from the companion books that go with each set.

    
    Now, back to my overwhelming scrap fabric problem.  It is time to put those templates to work.  I decided to set aside the projects on my to-do list for an entire day and simply enjoy sewing something without a deadline.  I had an idea rolling around in my head to use the A template from the Crazier Eights set (that is the kite shaped piece that fits in the corner).  I cut four of the A template from the same piece of fabric and pressed all of the blue, green, aqua, purple, sage, navy, grass, lime, teal,... basically any color in the blue, green or purple family, that I could find in that basket.  Any scrap 3" or longer and 1" wide was pressed and ready to use.

    Here is a photo of the nine blocks I created in one day.  They will measure 10" in the finished quilt.  Not a lot of progress for an entire day of sewing, pressing and trimming.  Then again, not everything worthwhile is "fast and fun" or "quick and easy".  Sometimes it is worth the time and effort to slow down and enjoy the process.  

    There were plenty of creative moments working on these blocks.  Right from the start I decided on that half inch black outline to emphasize the scrappy diamond shapes.  With half the blocks completed, I decided I didn't like the black.  After a quick trip to the grocery store, I gave it a second look and decide I was right in the first place, those black lines keep the scraps from fading into the kite shapes.  That started the creative ball rolling.  What if the background were neutral and the scraps in high contrast?  What if the star points didn't meet? What would it look like if I added a scrappy narrow sashing? What if the A template were scraps and the diamonds were solid?  Remember, I don't have a pattern to follow.  If I love this in the end and think that you will too, I may write instructions for the project.  Right now, I just want to sew and make something beautiful.

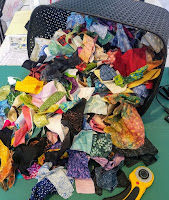
    My goal was to clean out scraps.  The kite shapes are actually cut from what I consider scrap fabric.  They are larger pieces left over from other projects.  Larger pieces are not my problem.  It is those small scraps I thought I would be clearing out of my stash.  I can't say that these blocks didn't use up plenty of fabric.  Because I was trimming to assorted widths from odd shaped scraps, plenty of fabric ended up in my trash basket.  In fact it looks as if as much was tossed as ended up in the blocks!

    Throwing away the trimmings is not a problem for me.  I know that the best part of that scrap now lives in a pretty cool block that will eventually become a pretty cool quilt.  Everything in that trash basket is less than 3/4" wide.  Scraps that were larger than that, but not suitable for strips have been set aside.  There may be some crumb quilting in my future.  Meanwhile I will be making at least three more blocks for this project.  Possibly more, but right now I have to get back to that to-do list.

Tuesday, July 13, 2021

Loaves and Fishes


    I have come to the conclusion that anyone that denies the accuracy of the biblical story of the loaves and the fishes, has obviously never made a scrap quilt.  Normally I would stay away from topics like politics and religion here on the blog, but my last project seems to have proven the impossible.

    There is no denying that I have a substantial "stash" of fabric.  Including everything from tiny scraps, fat quarters, one yard cuts and yes, even bolts.  Although I have enough fabric to last a lifetime, that has never stopped me from adding more when I find something I like.  Other additions to my shelves and bins come from the work I do for fabric manufacturers.  The best way that I have found to keep my stash under control is to keep sewing.  Luckily that's my job.  

    A few of my scrap bins are sorted by style.  This particular bin holds my assortment of what I call Kim Diehl fabrics.  Kim is a designer with a specific style and color pallet that I enjoy.  My bin contains fabrics from a variety of designers and fabric companies, not just Kim. But all of the colors and prints play well with Kim's designs.  The shades are warm and toasty.  I think of them as "decorator" colors because they are easy to live with.  These colors and fabrics fit well into our house in Pennsylvania, but are a little dark and subdued for Florida living.  That doesn't mean I have given up this color pallet or style but I do think it is time to clean out that overflowing bin.

    Next up on my things-to-do list was the filming of the video class for the Baby Chains project in the Summer Fun Bundle program.  If you aren't familiar with the Fun Bundle series, the program works like this: You purchase a bundle of fabrics, patterns and notions from a participating shop.  Your bundle includes an invitation to a private Facebook group where you can watch a video lesson on how to make the projects.  The videos include lots of additional info that is not included in the original patterns as well as step-by-step instructions filmed by me.  Baby Chains is a scrap quilt, and I think it is the perfect place to clean out that bin of fabrics.

    Here is a quick snapshot of the blocks that I made for the step-by-step video. The blocks are arranged on my design wall so that I can show how I assemble a quilt top working both horizontally and vertically.

    I admit that this isn't a huge quilt, but I did clean out all of the scraps of black background Kim Diehl prints that were some of my favorites. I used up lots of the red and rust colors from the Henry Glass groups that were the most recent additions to the bin.  This quilt also contains the last bit of a favorite blue fabric I have been holding on to for years.

The materials list for this quilt includes a total of just over 3 1/2 yards of fabric.  It stands to reason that after making these blocks there would be 3 1/2 yards missing from the afore mentioned bin - right?   Three and one half yards.  That is equivalent to a length of fabric one hundred and twenty six inches long by at least forty inches wide! A total of 5040 square inches of fabric have been removed from that bin and assembled into the quilt top.  There should be lots of empty space in that bin.

    That is not how scrap quilting works.  

    Even after my attempt to refold the small scraps into slivers so that only the edge shows. it became clear that what came out of that bin was going to have a tough time fitting back in.

    How is that possible?  I have no idea.  What I do know is that it is time to buy a larger bin.


If you would like more info on how to participate in the Summer Fun Bundle program email me at Karen@thequiltcompany.com and I will be happy to send you a list of the participating shops with links to their websites and/or Facebook pages.