Friday, December 2, 2022

It's the Little Things


     These are my keys.  I use them every single day.  I transfer them from my pocket to my purse and from my purse to my tote bag depending on where the day takes me.  Those keys are in my hands daily.  
    
    Attached to my keys are two scan cards, one for the library and one for the "Y" where I take an aqua aerobics class 3 days a week.  That black strap came with an inexpensive purse I purchased several years ago.  The strap has outlived the purse because it is very convienient to have.  It lets me loop my key onto my tote handle or I can slide it over my wrist when I don't want to carry my purse.  Now that car keys only have to be "in" the car and not inserted into the ignition, having things dangling on the key ring is no longer an issue.  The black strap makes things convienient.  That strap is also in horrible shape, it is peeling, flaking and falling apart.  I am embarrassed to have people see it, but I haven't given it up!
     
     Today is the day things change.  That strap is basically a folded strip of fabric.  I posess tens of thousands of dollars of sewing equipment.  I have enough fabric in my sewing room to blanket a house.  I own threads in every color imaginable.  I simply had to make the decision to take the time to DO it.  

     Can you relate?  Is there something that you have been meaning to do, but you keep putting it off?  TODAY is the day to get that small job done.  Just DO IT.  I promise that it feels really good when you have it done.

     Having put off this simple task for so long, I should be embarrassed to tell you that when I looked for a fabric strip to use, I already had one in my scrap bin, cut to the right width and length.  The fabric is one of my favorite Tula Pink prints and it was just sitting there all ready to go.  I pressed it in half, opened it up and pressed both sides in, toward the center fold.  It took longer for the iron to warm up than it did to press the strip.  Then I chose matching thread.  I already had a bobbin to match, so after threading my machine, a whole 30 seconds later, I was ready to sew.  Stitching down one side and up the other took about a minute.  I cut the old strap off and folded the new one over the key ring.  My BERNINA has no problem handling the bulk of 16 - yes SIXTEEN layers - of fabric to secure the new strap in place.  Done.

        Now my keys are going to make me happy each time I pick them up.  I won't be embarrassed to hand them to someone or have them hanging on my tote.  5 minutes of sewing was well worth the investment!  Now I am off to sew something a little larger - time to start a new quilt!


Sunday, September 25, 2022

By Annie, By Karen

     You are about to hear the tale of my very first By Annie bag.  It is hard to believe that with all of the samples I have made over the years, and the popularity of the By Annie patterns, this is my first attempt at making one of Annie's wonderful bags.  What was I waiting for?

    Evidently, I needed a push.  Jafex provided a gentle nudge in the Brand Ambassador program by way of a challenge.  We had the opportunity to select one of Annie's patterns and Jaftex provided the fabrics.  It doesn't get any easier than that! 

    The goodies from By Annie arrived before the fabrics, so I was guessing that mine would be bright and colorful.  I received both pink and green zippers and pink mesh for an interior pocket as well as the hardware and Soft and Stable for my bag.

    Then the Tropical Vibes fabric line by Emma Leach for Blank Quilting arrived and those colorful zippers made sense.  I immediately decided to "go green" with the toucan print, green zippers, ferns for trim and planned the larger toucan print for a fun lining.

    After skimming through the pattern, I had some second thoughts. (It is ALWAYS a good idea to read the entire pattern before starting your project). The toucan prints are directional.  As a By Annie beginner, I didn't want to risk having a directional print run sideways!  I opted to "test" the pattern using the multi directional flamingos instead. 

     Because I was convinced I was making a "test" bag, I decided to use the panel print from the fabric line on the back of the quilted fabric that you create for the bag.  I pinned everything into my longarm and quilted away.  Annie suggest a grid quilting, but I don't own a computerized long arm to do straight lines, so I chose one of my favorite designs.  It was my first time quilting with Soft and Stable, the foam type of batting, on my longarm.  It quilted like butter!  I was impressed!

    I cut out my pieces and "sealed" the edges as instructed.  Then I made the carrying strap with the shoulder pad.  That piece is made with several layers of quilted foam and has binding around the edge.  I decided if I could be happy with my workmanship on that piece, the rest of the bag would be easy.  Cheating, just a little, I made the entire piece out of the accent fabric.  My thought was if the binding was a bit wonky, it would be harder to see those issues with matching rather than contrasting fabrics.  The shoulder pad came out PERFECT - with the help of one of Annie's free videos.  I was so pleased - make that amazed - that I decide the flamingos would be "the bag" and no longer a "test".

    Following the pattern instructions I made interior and exterior pockets, and then installed zippers and binding as instructed.  I'm not going to lie, there were more than a few do-overs and several conversation with my seam ripper to make sure everything was straight and even.

    I could have made the whole process easier on myself if I would have taken the time to watch the instructional videos on the Tutorials (byannie.com) website before I started this project.  I also chose a pattern that includes two bags.  The instructions are written as if you have made the first bag before starting the second.  Naturally I chose to start with the second bag.  That required a lot of flipping back and forth to read previous instructions.  Once again, had I taken the time to READ the instructions and not just skim through the pattern, I may have made different decisions on how to approach this project and saved myself some aggravation.

    I am happy to report that all is well that ends well.  I finished the flamingo bag and I am thrilled with the results!  These photos show the front of the bag with the zippered pocket and the back of the bag with the open pocket. The top of the bag zips closed with double zipper pulls.  The mesh zipper pocket in inside the bag. I know that the giant flamingo from the panel print will make me smile everytime I open this bag.  Choosing the panel for the lining makes this bag really fun!  I may add something funky to every By Annie bag I make in the future, because I am sure this one will not be my last!

Friday, July 29, 2022

Anybody Gnome?

     I just made the easiest quilt ever!  It all started when FedEx dropped the latest package from Jaftex on my porch.  I wasn't expecting a package, but I am always excited when a bundle of fabric shows up at my doorstep!

    As soon as I opened it, without even checking the selvedge, I knew exactly who had designed it.  I have been a fan of Leanne of The Whole Country Caboodle for years... probably decades.  Her designs were the first fusible applique designs that I offered in my store.  I never missed the opportunity to stop by her booth at International Quilt Market to see what was new.  


    Leanne's latest fabric line, along with her daughter Kaytlyn, is called "Gnome Town Heros" for Henry Glass Fabrics.  The prints feature a variety of gnomes in the rolls of nurse, police officer, teacher, engineer, even artist (who isn't afraid to color outside the lines) and quilter!  The gnomes are in multiple sizes.  There is even one fabric panel that is large enough to make into stuffed dolls.  Another is printed so that it can be stitched into a soft book.  I chose to use the book panel as feature squares in a toddler size quilt.

    With an idea, but no real plan, I started by trimming each of the fabric book pages to a square. (
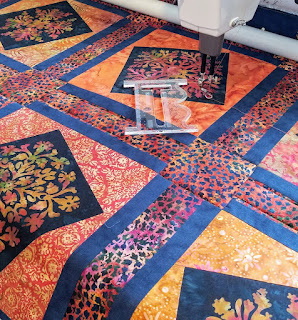
Those printed squares are never really square so you have to play around to find the size that works).  It turned out that 6 1/4" was the best choice.  A bit of an odd size, but that wouldn't be a problem.  I planned to use a few of the coordinates from the line to tilt the blocks using the Perfect Rectangle Ruler.  Once that was done, I could trim them to a more standard size.  After adding a half rectangle to each side, I found I could trim the blocks to 10 inches.  Using the Perfect Rectangle Ruler, tilts the blocks rather than putting them on point.  It looks a little more casual and adding the companion fabrics makes the featured blocks stand out.

    I chose to use 9 of the 12 pages to make tilted squares, but I wanted to end up with a rectangular quilt.  That's when the fun began!  I decided on 3 vertical columns for this quilt.  All I had to do was add rectangles of the other prints that were 10" wide and any height.  As long as I added identical size rectangles in each of the three columns, everything would fit together.  How easy is that!  No pattern needed.

    Each column would have 3 tilted blocks, alternating the direction of the tilt. (To change the direction, cut the triangles with the fabric face down.)  Then I added a strip of the border stripe to each column.  I cut the strip, including seam allowance on the top and bottom.  The height didn't matter, as long as all three segments were trimmed to 10" long.  

    Next I added the tossed print with the vehicles to each row. That is a super cute print, so I added two pieces! Then I decided it needed a little more red, so I cut narrower strips of that print.  All of this happened on my design wall, where I could rearrange the pieces, shifting them to keep the color moving around the quilt.  The grey prints were beginning to blend together.  I decided on some narrow black Jot Dot strips to break those areas up.  Column 2 needed those black strips, but that meant they had to be added to columns 1 and 3 as well.  A little rearranging and I the columns were ready to be stitched together.  How long is each column?  It doesn't matter.  I simply added pieces until it "looked about right".

    The three columns were each 10" wide and would finish at 9 1/2".  That would make this toddler size quilt only 28 1/2" wide.  Time to add some vertical sashing.  I decided on 2" finished sashing between the pieces columns and 3" finished border around the outside edge.

    The quilt top went together so quickly, that I decided to finish the project right away.  By making sure that the width of the quilt stayed below 40", I could use one width of fabric for backing.  (That works ONLY because I do my own quilting.  Most longarm quilters want a minimum of 4+" of extra backing on each side of your quilt top.  Nothing wrong with that.... but it is possible to squeek by with less width.  I never reccomend skimping on length.)  I had random widths of fabric left, so I stitched them together to form a striped backing.  I popped it on the longarm and let the ProStitcher do its thing.  I love that machine. #HandiQuilterAmara.

    Two piece machine binding was sewn together, and pressed while my HandiQuilter was working hard.  The quilt came off the machine and I trimmed it using my 20.5" Creative Grids square.  Once again, having the right tools makes any job so much easier.  First I pinned and then stitched the binding to the back of the quilt.  Then I folded it around to the front and stitched the binding in place by machine on the tiny grey flange.  

    This was such a fun project, no rules, the right tools, fun fabrics and everything fell into place.  Give it a try!  Now that it is complete, I know the perfect little person to give it some love.  It's all yours Jack!


Thursday, June 2, 2022

Wilderness Trail

     My latest Jaftex Challenge definitely qualifies as a challenge.  As a Brand Ambassador, I was convinced that the next bundle of fabric goodness from Jaftex would contain Christmas fabric.  The style might be traditional, or it might be novelty, but it would most assuredly be red and green.  The calendar might say spring, but this is the height of the holiday season in the fabric world.  I was so confident in my prediction that I believe I was even humming Jingle Bells when I opened the package.  Wrong.

    My new fabric challenge is Wilderness Trail by Ed Wargo for Blank Quilting.  I have to admit that it threw me for a loop.  I was prepared for out-of-season Christmas sewing.  I was not expecting a different out of season and north woods prints!  Moose, bear, log cabins, campers, fish and wolves howling at the moon are not my normal go-to style of fabric. This is also the fabric bundle that I am to use for the Brand Ambassador Summer Challenge.  We have been asked to choose a pattern from the Home Decor section of the Jaftex sponsored, Sew it Yourself website for our next project.  

    The Sew It Yourself website https://siysewityourself.com/ is packed with fun projects that are FREE for you to download.  You should check it out!  

   I had originally chosen the Emblem Pillows as my project.  After the fabric arrived it was obvious that the large-scale prints were not suited for pillows.  I opted for the Symone Quilt instead.  Choosing the quilt made perfect sense.  It uses the triangle in a square shape and the half rectangle.  I happen to design those rulers for Creative Grids.  The pattern provides templates or suggests using the Wonder Triangles or Tri Rec tools.  Obviously, I would be using the Creative Grids tools that are the same shape, only larger.

    The pattern is written for fat quarters, so I cut my bundle into fat quarters and decided to make the pattern exactly as written, except for the change in ruler brands.  Super easy.  Just follow the instructions.  Except....

    The triangles in the pattern are 6" finished.  Some of the fabric prints are LARGE in the Wilderness Trail fabric line.  It isn't easy fitting a moose in a 6" triangle.  No problem.  Luckily, I have larger size rulers, so I decided to make my triangles 8".  I will make the quilt exactly the same as the pattern, except the triangles will be larger.

    After cutting all of the fabrics into triangles and fussy cutting the larger shapes from both the panel and the pillow panel squares, I separated the triangles into lights and darks.  I chose to start the layout with all of the light triangles pointing down and the darker ones pointing up.  

   It quickly became obvious that the Wilderness Trail prints could use some "breathing room".  I went to my scrap basket and cut some neutral triangles that read more solid to give your eye someplace to rest.  Then I filled in with the triangles that featured an image.  All of those were inserted so the image was right side up.  That helped me in the assembly process.  If I became confused as to where I was in a row, it was easy to figure out because none of the animals should be standing on their heads!  I was making the quilt exactly like the pattern, except for the size of the triangles and the addition of many more fabrics.

    One of the Wilderness Trail fabrics is orange.  Having only a few large orange triangles really made them stand out.  Back to the scrap basket I went, where I chose another orange print to help move the color around the quilt top.  That really helped, but it still needed something.  It needed more orange, but not large areas.  I wanted it sprinkled around the quilt.  The only way to achieve that was to make large triangles out of smaller triangles.  Super easy!  Four smaller triangles make one large triangle.  My triangles finished at 8" so I would need smaller ones that finished at 4".  I cut the 4.5" triangles from scraps.  A slight modification to the pattern that I was following exactly, except for the size difference, the number of fabrics used and the additional piecing.

    I was ready to sew everything together when I realized that the printed pattern had seven rows.  That means that unlike the top row, the triangles in the bottom row have seams that begin/end at the very corner of the quilt top.  This quilt does not have a border, and I would rather not add bulk to the corner for binding.  I did have some extra triangles..... I added another row to the bottom of my quilt.  Very easy to do and just a small change to the instructions that I was following exactly

    Here it is!  My Wilderness Trail version of the Symone Quilt, only slightly larger (48" by 64" instead of 36" by 42") with slightly more fabrics (13 prints + scraps instead of the suggested 10) with a bit of extra piecing tossed in.  Hmmm.... do you think I should add a border?

Saturday, May 7, 2022

Unplanned Renovation

    My husband and I are in the middle of an unplanned renovation. There was no disaster that needed repaired.  We did this to ourselves.  Once the ball started rolling, there was no stopping it.  We are not strangers to do-it-yourself projects.  We also knew when we bought this place that it would take plenty of work to make it the house we wanted to live in.  The latest project is one that fell squarely into the category of "wouldn't it be nice... someday"?  Not something that had to be done.  To be honest, although I thought of it as something that should be done, I didn't think we would be the ones to do it. "Someday" arrived last month when the contractor we were working with to replace our roof said he could do the structural part of the job at a reasonable price.  Starting in 4 days!  I normally ponder a new paint color for at least a month.  This meant I had to decide on type of flooring, closet size, choose stone and purchase a fireplace, mantel and lighting almost overnight!

    Building, much like quilting, should follow a specific order.  Obviously, you can't sew your blocks together until you have made the individual units that make up the blocks.  Those blocks become rows and the rows become your quilt top.  You just follow the plan.  Building from scratch is very similar.  Renovation is more like mending or repair.  There are certain limits to the changes you can make, depending on the existing conditions.  

    This building project was to correct what we saw as a major design flaw in our homes floorplan.  Our living room had a soaring cathedral ceiling.  Both the first and second floor have extra high ceilings.  That gave the living room a THIRTY TWO foot high cathedral ceiling.  I am sure it looked good on the original plan, but in reality, that wall that reached three stories high, was impossible to paint.  Those second story windows were impossible to clean.  The batteries in the smoke detector at the ceiling peak were impossible to change as were the lightbulbs in the wall fixtures.  The room practically begged for a second floor to be installed.  It is just my husband and I living here, so we don't really need the space.  That put the project on the "wouldn't it be nice" list until last month when Edwin the contractor and his team offered to do the structural work.

     First came the plastic.  It was everywhere.  The purpose of the plastic was to control the dirt.  It doesn't.  It certainly makes it much better than if there were no plastic, but nothing stays clean.  Nothing.  My commute to work, which is as simple as walking from the kitchen, to an upstairs bedroom, involved making my way through four zippered doorways.  We draped all of the furniture that we squeezed into other rooms with sheets.  It was like living in a haunted house.

    I am thankful that Edwin and his team made short work of cutting our house apart and putting it back together.  Considering that he fit our small job in between others he was working on at the same time, it could have taken much longer.  Then again, he was only contracted to do the structural and drywall work.  Cary and I are on the hook for the finishing this project.


    Finishing means everything from painting to adding the wood ceiling and installing the stone on the fireplace.  I married a do-it-yourself guy, so I was well aware that I would be holding the other end of a board, or handing tools up to him on a ladder until the project is officially finished.  What I didn't consider is that neither of us are as young as we use to be!

    Meanwhile, my dining room looks like this, because we also had to reprint several of my patterns and books.  The storage area where we keep those items is behind some of that plastic drape.
    My guest bedroom looks like this.  Those quilts are normally on shelves in what was previously a loft area.  They are sealed into the guestroom for now to keep them free of drywall dust!

    You might be thinking that amount of chaos is enough for any one person to deal with.  You would be wrong.  About the same time that the contractor finished his part of the job, the landscaper we have been waiting on for months showed up to scrape and re-sod our front lawn!  Between the new paint job, the new roof, the new lawn and the dozen changes inside the house, I am sure the neighbors are wondering why we didn't buy a house that we liked!

    One thing I learned about myself in this process is that I can have total chaos in my sewing room OR in my house, but not both of them at the same time.  With the house in total disarray, I had trouble concentrating on projects.  My only choice was to use the little time I had in my sewing room to clean up and organize.  
    
    Pat Sloan is crazy efficient when it comes to being an organized quilter.  In one of her videos she talks about being neat and keeping her fabrics folded because they take up less room.  I love Pat, but I work messy.  I have the room to work messy.  With the desire to put some order in my life, I decided to sort and press one small laundry size basket of scraps and test Pat's theory.  I have proved Pat's point.  Here are the before and after photos of the same basket!

    That basket is lovely.  I didn't remove any fabrics unless the fabric was in the wrong basket (I have one for each color).  I have been convinced that neat definitely saves space.  I also know for a fact that when I have the chance to use those fabrics, the aftermath will look a lot more like the before photo when I am finished.  The process did give me the opportunity to look through those pieces and make plans for future projects. 
      Those optional sewing projects will have to wait a little while longer.  I'm busy adding "stone mason" to my resume.  The new flick-a-switch fireplace is installed, and I am in charge of arranging the stone face.  After the fireplace is complete my husband gets to finish the trim and touch up all the painting.  Carpet will be installed in the new room sometime in the next 2 weeks.  Then we get to shift furniture.  We will move my husband's things out of the old loft and move my Handi Quilter into its new home.  That will create more room in my sewing room and more space for the equipment I need to film video lessons.  


    There is hope on the horizon that I will get back to sewing sometime soon!


Thursday, April 21, 2022

Boo Who?

    I seem to start plenty of conversations with "It's been a little crazy around here".  So many of them that I think I am going to have to redefine my idea of "normal".  It is possible that a bit of chaos IS the norm in my life.  

    Most of the upheaval revolves around our house renovations.  We bought a fixer upper that is on a quiet street, close enough to walk to the beach, with a perfect sewing room.  Then we proceeded to change everything else about the house.  I could go on, and on about living with the debris of our latest project. 

    Building a new second floor over our current living room has turned my house upside down.  There are two sofas in the kitchen where the table should be.  End tables, lamps and artwork line the walls in the dining room.  Plastic drape with zipper openings covers most of the doorways on both the first and second floor.  Despite the plastic and our contractors' best attempts, drywall dust is everywhere.  This is the first time since we moved here that I have found myself wishing I could leave the house for work.  

    This week, my work includes taking the style shots of my latest Jaftex project.  BOO! is the name of the fabric collection by Delphine Cubitt for Henry Glass Fabrics. I couldn't resist working the name of the fabric line into the quilt. The whole quilt is made using 4.5" cut squares from every fabric in the line. There are a few half square triangles and a few clipped corners mixed in. Even better, the whole fabric line glows in the dark! The white background prints that I used for the letters are from the "Lower the Volume" group from Blank Quilting, another of the Jaftex brands.

    The quilt has been finished, quilted and bound for several weeks. My problem was finding a spot to take a great photo. It doesn't look like the contractors will be done before my deadline, so I have decided to make the best of things. Notice the new drywall and missing plug cover in that photo? I will do a little creative cropping to make this photo work. Normally I can take outdoor shots of the larger quilts. Obviously Halloween happens in the fall, so this one is a bit tougher. It is very hard to make spring in north Florida look like fall when everything is blooming.

    In addition to the quilt, I needed to make something for the Scrap Crazy Challenge for the Brand Ambassadors. All of the Ambassadors have received a set of the 6" templates and one of my books to inspire them. It is very fun, especially for me, to see what they have come up with.

    For my part, I chose to make a runner using the A template from the Scrap Crazy 6" set. I alternated those stars with a stack-and-whack style block cut from the stripe that is part of the fabric line. Those blocks are also made with the A template. Once again, all of the white you see in the fabric prints glows in the dark! It looks great when the lights go out.

    Luckily the bin of our Halloween decorations was easy to reach in our attic space. No wide-angle shots of this runner, unless you want to see the cartons of stone that will soon be the face of our new fireplace in the background. I am going to consider my BOO! projects complete and tuck them away until October. Keep your fingers crossed that construction will be complete and my house will be back in order long before the real Halloween rolls around!

Thursday, March 10, 2022

UFO Week Day #5


    My apologies.  I completely forgot to take progress shots for this UFO.  I was so excited to work on it I didn't even think about photos until I was stitching the binding down (by machine).  Maybe the story behind this UFO will make up for the lack of photos.  

    The quilt top (including the borders) was made in 2006/2007.  The Tulip Wreath was a class sample I designed to teach free motion machine embroidery.  That is a technique where you fuse the shapes in place then drop the feed dogs on your machine and draw around the shapes with thread.  It is a little like free motion quilting, but less stressful and without batting and backing.  The stitching is done only on the top layer of the quilt.

    Like many of my UFO's once the top is made, I have what I need, so I am in no hurry to finish the project.  This one ended up being hung in the bathroom in the quilt shop I owned in Pennsylvania.  Until it was STOLEN.  Yes, some unscrupulous person used the bathroom and decided to take this quilt top right off the wall!  We discovered it missing on a Monday morning after a particularly busy weekend.  At the time, the husband of one of my employees worked for the FBI, so she jokingly taped a huge "X" of crime tape over the area where the quilt previously hung.  We made a big deal out of telling anyone in the shop that our bathroom was a crime scene and that a top had been stolen.  I was amazed that someone actually took the unfinished quilt top.  I'm well aware that people shop lift, but that top was photographed and on the front of my published pattern!  The fabrics were discontinued, and we had never sold a matching kit, so anyone local that saw the quilt top would know it was the same one on the front of my pattern.  Who was the thief going to show it to?  I assumed the person that sole it was someone just traveling through, and I would never see that top again.

    Fast forward a year or more.  One evening before a group meeting in the shop, I was at the cutting table surrounded by customers.  Someone made the remark that "quilters don't steal".  I laughed and said, "Sure they do".  We had a whole sewing machine stolen from the classroom and I mentioned that the Tulip Wreath sample was stolen right off the wall.  Then someone asked, "What do you do?"  Still feeling a bit snarky about the incident more than a year later, I replied "Not much I can do, so I just say a little prayer every night that whoever took it rots in hell".  I know, I know, not my finest moment, but I did laugh a little when I said it if that helps.

    Low and behold about two weeks later a plain brown envelope, with no return address arrived in the mail.  You guessed it.  The Tulip Quilt sample was inside.  I have to believe that whoever took it was standing at my cutting table that night and heard what I said.

    After its traumatic experience, the Tulip Quilt deserved to be custom quilted.  I haven't really felt my skills were up to par until now, so when I looked for my next UFO project, I decided today was the day!  I filled the yellow area with free motion loops and wiggles.  I used the computer to stitch a beautiful design on the floral triangles.  Back to loops and squiggles in the lavender border using matching thread and then I attempted some (free-hand) sort-of-straight with rounded corners quilting in the dark green border.  I also used the dark green thread to go back through the wreath.  That tacked that area down and attached it to the batting and backing so that everything lays flat.  Machine binding using a darker green fabric.  There is no way I have the same shade of green batik from 2006!

The Tulip Wreath has a few scars from when it was being held captive.  There are some dirty marks that won't come out.  That is ok with me.  For the time being I have hung it over the bar (Or butler's pantry if you watch a lot of HGTV) just off my kitchen for a touch of spring.  The runner on the counter is an oldie, but a goodie.  It is simply a half yard of a double border print with a basket appliques on each end.  I'm sure it dates back to the 1990's as well.  Anyone remember Debbie Mumm?  She was very popular in the last millennium. 

    FYI, I did get the binding on the Perfect Tilt quilt.  Now I just need an evening and a really good movie to get that binding hand stitched in place.  Any suggestions?


UFO Week, Day 4.

     I am making some progress on the blue and orange Perfect Tilt quilt on my longarm.  One thing I have learned this week is that custom quilting with the computer is not my "thing".  I love the results, but I am just too impatient to dedicate that much time to a UFO quilt.  Much like machine embroidery, 10% of the time you are actually doing something the other 90% you are watching the machine run.  I much prefer to use the ProStitcher to quilt edge-to-edge designs.  

    While the longarm was doing its thing, I kept my fingers busy by embroidering the stem on my scribble flower.  I know this project doesn't qualify as a UFO, but it did allow me to accomplish something while I was watching the machine run.  Almost.  I stitched the entire stem, took a look at my handwork and decided that the stem stitch looked too wimpy to hold the flower up!  After removing the stem stitches, I decided to couch a piece of 1/8" green ribbon in place to make the stem look sturdier.  I happen to have an acceptable shade of green in my ribbon bin.  If you look closely, you can see that spool is from "Woolworths, America's Craft Store".  Any guesses how long that spool has been in that bin? (Hint, the U.S. company ceased operations in 1997!)
    
    Itching to sew something, I decided to add backing and batting to this project and do a little echo quilting around the flower on my domestic machine.  "Domestic" is a fancy word for my regular sewing machine.  I haven't done much hand guided machine quilting since having access to a longarm.  I thought I should brush up on those skills.  They did indeed need some brushing up!  
    After echo quilting the center, I decided to pull out my collection of hand quilting stencils and mark those dark, pieced borders.  I used the hand quilting stencils even though I would be doing the stitching by machine.  I made sure I selected a continuous line design.  Finding a marking device that will show on all of those shades was a challenge.  I finally decided on a white chalk pencil.  Making a stencil fit and wrap around a corner can be a challenge.  I made it happen, it is not perfect, but I can live with it.  Black binding and I can call this WIP complete.

    I did promise that I would dig deeper into my UFO pile for the next project.  To live up to my promise, I decided that today would be Small Project Day.  The piece on the right is one of the oldest UFO's I own.  I'm sure it dates to the mid 1990's!  Imperfectly perfect, the color balance is off, the quilting is.... pretty bad.  That is probably why it ended up in the UFO pile.  There was still some reason that I have never tossed it.  Maybe it is to remind me of how my skills have improved?  I finished it off by adding some additional quilting so that it would lay flat and then added a ridiculous green ticking stripe binding that is almost as old as the top.

    I had time for one more small project.  The small piece with the multicolor squares is probably 15 years old.  I originally made it as an example of how seams should be pressed.  I was told by another reputable quilter that pressing all the seams in one row in the same direction is not a good idea.  I had to test the theory, and this is that sample.  For years this small project had a different black border.  It ended up in the UFO pile because that border fabric was just not black enough.  I removed the old border and replaced it with a black with tiny dots and finished it off with some straight-line machine quilting.
    The center of the quilt is quilted from corner to corner in magenta colored thread.   The black border is quilted in black and the quilting lines are random widths apart.  The white chalk line helps me know where to pivot on the corner.
A quick machine binding with magenta fabric and this project is finally finished.
    Working on these small projects reminded me of a woman that worked for me years ago.  She saw me making a small quilt and remarked "You know, if you make those seams a little longer, that will fit a bed".  I had to laugh.  Small quilts really are the same amount of work, can have the same number of pieces and are usually made in the same patterns as larger quilts.  There is just something fun about seeing the smaller version.
    
    I will get to enjoy these small quilts for (hopefully) years to come.  Now that they are finished, I have added them to the wall in my sewing room.  The wall behind my longarm holds the sign from the shop I owned in Pennsylvania, an old Mountain Mist batting wrapper, a watercolor by Diana Phalen and some cross stitch pieces that I designed years ago.  Now I have added these three quilts to the collection, and I still have plenty of space to fill. 
    Notice that the longarm is empty.  I forced myself to finish that blue and orange quilt before I hung the small quilts for this photo.  Even with all the complaining, I do have to say that I am happy with the way the quilting turned out.  Maybe it was worth all that effort.  I am off to make and then sew the binding on the Perfect Tilt project before I start on anything else!  I won't be able to call that project finished for a while.  The small quilts got the machine binding treatment.  The Perfect Tilt project is a larger quilt and I will be stitching that binding by hand.

BTW I LOVE that you are sharing the projects you are finishing on Facebook.  Keep up the good work!

Wednesday, March 9, 2022

Day #3 of UFO Week

     It is Day #3 and I'm feeling pretty confident about my machine quilting skills now that I have completed the sacrificial table runner from Day 2.  Some might say overconfident, but what have I got to lose?  I have plenty of UFOs to practice on!  I went searching for a larger project.

    This quilt top has these great diamond shapes that are begging for custom quilting.  The top is in the ballpark of a twin size quilt, without borders.  The lack of borers is the problem with this quilt.  This top was made many years ago, and now the navy batik fabric is impossible to match.  Dye lots change.  Batiks are hand dyed so even bolts from the same manufacturer can vary in shade from shipment to shipment.   Normally I would have set aside fabric for the borders from the same bolt of fabric.  Maybe I did?  If I did, it was in the ballpark of 8 - 10 years ago.  All I know is that I don't have that shade of navy in my sewing room now.  If you look closely, you can see the threads where I ripped a border length off that I thought would be a "good enough" match.  It wasn't good enough.  This quilt deserves better.  I pulled this top from that pile of tops that "need something".  It is going right back in that pile, because it still needs something - a border! 

    Meanwhile, in my search for the elusive border batik, I came across a good size piece of navy print batik backing fabric.  It is a fun print, but definitely not right for the striped quilt above.  The navy is a good shade, but the print is directional.  There are birds that all face the same way so in my mind it has a definite top and bottom.  

    I tossed the backing fabric to the side and it landed next to this navy and orange quilt.  I didn't like that backing for the multi color batik quilt, but it looked pretty cool with this navy and orange sample of the Perfect Tilt.  If I were shopping for backing for this project, I may not have selected this one, but the more I look at it, the more I like it!  I love a quilt with an interesting backing fabric.  Off to the quilting machine!

      One thing I have learned is that I think longarm machine quilting looks best when the areas are outlined and/or stitched in the ditch.  In the Nine Patch a Day Group on Facebook, we have discussed that pressing your seams open (and leaving them pressed open) can be an issue if you plan to stitch in the ditch.  The quilting machine can pop those stitches and create problems in your patchwork.  YOU may not plan to stitch in the ditch, but believe me, your professional quilter probably does.  That is the way they travel from place to place without having a zillion ends to tie off.  Luckily, I had followed my own advice and pressed these seams properly.

    Step one after loading the quilt and making sure it is perfectly square is to stitch in the ditch or 1/4" in around all of those orange print sashing areas.  I chose an orange top thread to blend in.  Orange and blue are complimentary colors.  That means that orange thread will REALLY stand out on blue fabric and the reverse.  With a navy and white backing, I chose white bobbin thread to help hide my not so perfect quilting skills.  I could have chosen navy, but I had 2 white bobbins wound and ready to go.  Decision made. 

    The next step was to stitch in the ditch around all of those large orange squares and just outside those navy tilted squares.  

    All of that stitching - very little of it actually shows - took FOREVER.  Slow and steady wins the race in this case.  This UFO is going to be a multi-day project.  I simply don't have the energy or brain power to choose designs, position and crop them to fit into the background areas of the blocks.  Whew, that took far longer than I expected.  Tomorrow is another day. 

    This orange and blue quilt is also a relatively new UFO.  It is only about 2 years old.  I don't want to give you the impression that ALL of my UFO's are recent, so I will take a deeper dive to the bottom of the pile for the next one! 

Tuesday, March 8, 2022

UFO Week, Day #2


    Busy day today.  In order to stay on track in my quest to finish UFOs this week, I chose an easy one.  Many of you saw this quilt top on my design wall a few weeks ago in the Nine Patch A Day Group on Facebook.  The top was made in March of 2020.  The pattern is Any Twelve Will Do featuring the Perfect Rectangle Ruler that I design for Creative Grids.  At the time I offered a free handout for the pattern.  Since that time it has been published as a Cut Loose Press pattern and is available to purchase here: Any 12 Will Do Runner PDF Pattern – CutLoosePress™

UFO Week, Project #2:  Any Twelve Will Do Runner.

Requires: Quilting and binding.

The Reason this project is a UFO: I'm going to be honest and say the real reason is sloppy pressing and dirty marks.  Sometimes I don't practice what I preach.  In a perfect world I would always press my seams open, and then press them to one side.  Many people don't think that will make a difference, but if you are really picky about the way your finished projects look, I promise you it does.  

    This runner top was tossed to the side because I was unhappy with the way the seams were laying.  Having just rolled them to the side, I could easily see which direction the seams were pressed. Normally that isn't a problem, especially if they are in some symmetrical pattern. In this case the seams were going every which way and it was OBVIOUS.  I knew that pressing them open and then to one side would fix the problem, but I kept telling myself it didn't matter.  

    There are areas in this quilt top where lots of seams come together.  In my effort to finish quickly, I didn't check the bottom of my iron.  Running the iron over the lump where seams came together created a dirty spot on the white fabric.  Always on the white fabric.  More irritated at myself than anything else, I tossed it into the UFO pile.

Progress:  Some projects were meant to be a learning experience.  I decided to sacrifice this one to my learning curve on the longarm machine.  I did take the time to repress the most offensive of the seams before loading the backing, batting and runner into my Handi Quilter.  It is important for you to know that I only quilt my own projects.  99% of them are quilted using the computerized ProStitcher and an all over pattern.  I don't do "show-off" quilting.  The machine does have amazing features that I rarely use.  I also own several of those fancy quilting rulers, many of which are still in the package.  No time like the present to play around a little and see what I can do with the right tools.

    First of all, custom quilting is worth every single penny.  You have no idea how involved it is until you have tried it yourself.  I have walked a mile (or stitched a few thousand yards of thread) in those shoes, and I am here to tell you that it isn't as easy as they make it look!  For allover designs you set the design and let the machine do its job.  To custom quilt you have to create designs, resize, define then crop either inside or outside of an area, reposition start and stop places and use other features that I haven't even attempted.  I wouldn't say it is difficult, but it is technically precise and challenging.  The learning curve is steep.  Especially if you take my route and experiment rather than watching the educational videos.  Skipping that important information was probably a mistake!

    For example, when you crop a design, the machine stitches straight, along the invisible line you created when you established the crop.  As you can imagine, it is difficult to establish the position of an invisible line.  Now that I have done it 24 times, I am beginning to get the hang of my machine.  I wanted those stitch-in-the-ditch lines IN the ditch.  Now I'm not so sure that is a reasonable expectation.  What I should have done is to make sure that the blue thread would be stitching on the blue fabric.

    I did learn to crop, center, use rulers to stitch in the ditch, invert and mirror image designs.  The dirty, lumpy runner was the perfect project to experiment on.  There were no "What if I screw up" moments of panic.  I wasn't worried about making this project worse. The fact is, the imperfect quilting actually made it better. 

  When it came off the quilting machine, I pressed, trimmed and stitched the binding in place.  This project got the fused in place and stitched in the ditch by machine binding treatment.  It is done.  Finished.  Officially graduated from the UFO pile.

    Naturally I see every mistake and there are plenty to see.  I tossed it on the kitchen table for the photo shown above.  My husband came in, took one look and said, did you quilt that?  I confirmed that I did.  His response was "That's impressive".  Proof that you are always your own worst critic.  Let others enjoy your work without burdening them with your own disappointment.   


Monday, March 7, 2022

Welcome to UFO Week!


    Last week, the addition of new shelves in my wholesale department required moving, sorting and finding another home for several items. (The "wholesale department" is the closet where I store the patterns that I sell to quilt shops, who eventually sell those patterns to you.)  When I move one thing in my sewing area it sets off an avalanche of other moves.  The result was the unearthing of several more projects that were added to my UFO pile.  I decided that something had to be done and the time is now.  I have officially deemed this week as UFO Week.

    I began sifting through the pile, sorting the tops that need to be quilted from those that need borders and the quilted pieces that only need bindings.   I ended up with another pile that needs something... I'm not sure what it is that they need, but something has prevented me from thinking that the top is finished. That something is the reason the project landed in the UFO pile.

    I started to wonder.  What is the difference between a UFO and WIP?  Quilters like to use cute terms and abbreviations to label their work.  WIP stands for Work In Progress.  Aren't all unfinished projects works in progress?  Admittedly some progress is slow... very slow, but when do you decide there will be no more progress?  Why is it that some unfinished projects have hope as a WIP and others are banished to the corner or back of the closet as a UFO?  WIP projects are like those leftovers that you wrap and place in the frig with good intensions of using them for something tasty.  Then they get moved to the back, behind the things you use daily.  The next thing you know they are a UFO weeks old and headed for the trash.  What happened to the potential they had?  What keeps a WIP from being banished to the bottom of the UFO bin?

    With my Handi Quilter cleared of the latest project and not yet piled with stacks of deadline projects, I have decided to dedicate at least a part of each day toward making a dent in that UFO pile.  The tops that are simply waiting to be quilted is the easiest place to start.  

UFO Week, Project #1:

Project: Easy Street Quilt

Requires: To be quilted and bound.

The reason it is a UFO: This one is more of a WIP.  It is not quite 2 years old.  It is the sample featured on my Easy Street pattern that features the Straight Out Of Line ruler by Karla Alexander for Creative Grids.  Once the project photo is taken, I don't need to finish the project unless I want to show it off.  I will be vending at the quilt show in Jacksonville, Florida in September, so now is the perfect time to finish this project.      The REAL reason it is a UFO is that after assembling the blocks and taking the photo I noticed that the random arrangement of the blocks, wasn't as random as I originally thought.  Two blocks featuring the monkey print are facing the same way in the top row.  I set the quilt top aside, intending to take one of those blocks out and rotate it 90 degrees and put it back in before quilting the quilt.  Months later, those two blocks don't bother me anymore.  This is a baby quilt.  Will the baby that uses this quilt care about those monkeys that face the same way?  I doubt it.  Will that child not get into Harvard because their baby quilt had a block that may have looked better facing a different direction.  I think not.  I know for a fact that no baby will every enjoy using this quilt if it stays in my UFO pile.  Done is better than perfect.

Progress:  I have lots and lots of fabric in my sewing room so finding a backing for this project was easy.  It is not the perfect shade of green, but in my effort to save the life of a UFO, a fun backing is better than none.  I loaded it onto my Handy Quilter Amara.

    Next, I had to choose a thread color and quilting pattern.  I normally quilt with 50 wt. embroidery thread for one single reason.  I own a TON of it.  I have almost every color imaginable, so why not use it?  For this project I had the skimpy spool of the perfect color or the much larger spool of the "ok color".  I decided to play it safe and go with the ok color!  Running out of thread would certainly dampen my enthusiasm for finishing this project.

    My longarm is computerized so quilting is as simple as selecting the design you want and telling the machine the size of your quilt.  The computer makes the magic happen.  For this project I chose a curved design that looks like a monkey wrench to me.  There are monkeys on the fabric, so it seemed like a good choice.  While the Amara was doing its thing, I searched out a length of the border fabric that was cut from the edge of another quilt long ago.  It was more than enough to make the binding for this project.  (Side note: That border and binding fabric are a texture print that I designed many years ago for Timeless Treasures Fabrics.  I created the texture by doing a layered Crayola rubbing on the front of my refrigerator!)

    When the quilting machine was finished stitching the allover design, I trimmed and then stitched the binding in place.  I like to finish bindings by hand stitching the binding on the back of the quilt, but this quilt got the stitch in the ditch by machine finish.  FINISHED - that feels good!

Day one of UFO week was very productive!

Why don't you join me and celebrate UFO Week by finishing up a few of your own UFO's?