I am making some progress on the blue and orange Perfect Tilt quilt on my longarm. One thing I have learned this week is that custom quilting with the computer is not my "thing". I love the results, but I am just too impatient to dedicate that much time to a UFO quilt. Much like machine embroidery, 10% of the time you are actually doing something the other 90% you are watching the machine run. I much prefer to use the ProStitcher to quilt edge-to-edge designs.
While the longarm was doing its thing, I kept my fingers busy by embroidering the stem on my scribble flower. I know this project doesn't qualify as a UFO, but it did allow me to accomplish something while I was watching the machine run. Almost. I stitched the entire stem, took a look at my handwork and decided that the stem stitch looked too wimpy to hold the flower up! After removing the stem stitches, I decided to couch a piece of 1/8" green ribbon in place to make the stem look sturdier. I happen to have an acceptable shade of green in my ribbon bin. If you look closely, you can see that spool is from "Woolworths, America's Craft Store". Any guesses how long that spool has been in that bin? (Hint, the U.S. company ceased operations in 1997!)Thursday, March 10, 2022
UFO Week, Day 4.
Wednesday, March 9, 2022
Day #3 of UFO Week
This quilt top has these great diamond shapes that are begging for custom quilting. The top is in the ballpark of a twin size quilt, without borders. The lack of borers is the problem with this quilt. This top was made many years ago, and now the navy batik fabric is impossible to match. Dye lots change. Batiks are hand dyed so even bolts from the same manufacturer can vary in shade from shipment to shipment. Normally I would have set aside fabric for the borders from the same bolt of fabric. Maybe I did? If I did, it was in the ballpark of 8 - 10 years ago. All I know is that I don't have that shade of navy in my sewing room now. If you look closely, you can see the threads where I ripped a border length off that I thought would be a "good enough" match. It wasn't good enough. This quilt deserves better. I pulled this top from that pile of tops that "need something". It is going right back in that pile, because it still needs something - a border!
Meanwhile, in my search for the elusive border batik, I came across a good size piece of navy print batik backing fabric. It is a fun print, but definitely not right for the striped quilt above. The navy is a good shade, but the print is directional. There are birds that all face the same way so in my mind it has a definite top and bottom.
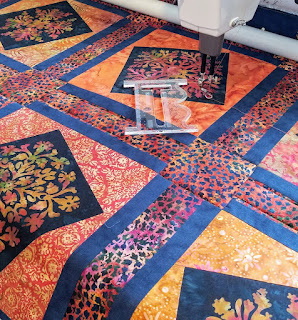
I tossed the backing fabric to the side and it landed next to this navy and orange quilt. I didn't like that backing for the multi color batik quilt, but it looked pretty cool with this navy and orange sample of the Perfect Tilt. If I were shopping for backing for this project, I may not have selected this one, but the more I look at it, the more I like it! I love a quilt with an interesting backing fabric. Off to the quilting machine!
One thing I have learned is that I think longarm machine quilting looks best when the areas are outlined and/or stitched in the ditch. In the Nine Patch a Day Group on Facebook, we have discussed that pressing your seams open (and leaving them pressed open) can be an issue if you plan to stitch in the ditch. The quilting machine can pop those stitches and create problems in your patchwork. YOU may not plan to stitch in the ditch, but believe me, your professional quilter probably does. That is the way they travel from place to place without having a zillion ends to tie off. Luckily, I had followed my own advice and pressed these seams properly.
Step one after loading the quilt and making sure it is perfectly square is to stitch in the ditch or 1/4" in around all of those orange print sashing areas. I chose an orange top thread to blend in. Orange and blue are complimentary colors. That means that orange thread will REALLY stand out on blue fabric and the reverse. With a navy and white backing, I chose white bobbin thread to help hide my not so perfect quilting skills. I could have chosen navy, but I had 2 white bobbins wound and ready to go. Decision made.
The next step was to stitch in the ditch around all of those large orange squares and just outside those navy tilted squares.
All of that stitching - very little of it actually shows - took FOREVER. Slow and steady wins the race in this case. This UFO is going to be a multi-day project. I simply don't have the energy or brain power to choose designs, position and crop them to fit into the background areas of the blocks. Whew, that took far longer than I expected. Tomorrow is another day.
This orange and blue quilt is also a relatively new UFO. It is only about 2 years old. I don't want to give you the impression that ALL of my UFO's are recent, so I will take a deeper dive to the bottom of the pile for the next one!
Tuesday, March 8, 2022
UFO Week, Day #2
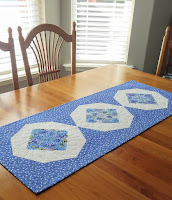
Busy day today. In order to stay on track in my quest to finish UFOs this week, I chose an easy one. Many of you saw this quilt top on my design wall a few weeks ago in the Nine Patch A Day Group on Facebook. The top was made in March of 2020. The pattern is Any Twelve Will Do featuring the Perfect Rectangle Ruler that I design for Creative Grids. At the time I offered a free handout for the pattern. Since that time it has been published as a Cut Loose Press pattern and is available to purchase here: Any 12 Will Do Runner PDF Pattern – CutLoosePress™
UFO Week, Project #2: Any Twelve Will Do Runner.
Requires: Quilting and binding.
The Reason this project is a UFO: I'm going to be honest and say the real reason is sloppy pressing and dirty marks. Sometimes I don't practice what I preach. In a perfect world I would always press my seams open, and then press them to one side. Many people don't think that will make a difference, but if you are really picky about the way your finished projects look, I promise you it does.
This runner top was tossed to the side because I was unhappy with the way the seams were laying. Having just rolled them to the side, I could easily see which direction the seams were pressed. Normally that isn't a problem, especially if they are in some symmetrical pattern. In this case the seams were going every which way and it was OBVIOUS. I knew that pressing them open and then to one side would fix the problem, but I kept telling myself it didn't matter.
There are areas in this quilt top where lots of seams come together. In my effort to finish quickly, I didn't check the bottom of my iron. Running the iron over the lump where seams came together created a dirty spot on the white fabric. Always on the white fabric. More irritated at myself than anything else, I tossed it into the UFO pile.Progress: Some projects were meant to be a learning experience. I decided to sacrifice this one to my learning curve on the longarm machine. I did take the time to repress the most offensive of the seams before loading the backing, batting and runner into my Handi Quilter. It is important for you to know that I only quilt my own projects. 99% of them are quilted using the computerized ProStitcher and an all over pattern. I don't do "show-off" quilting. The machine does have amazing features that I rarely use. I also own several of those fancy quilting rulers, many of which are still in the package. No time like the present to play around a little and see what I can do with the right tools.
First of all, custom quilting is worth every single penny. You have no idea how involved it is until you have tried it yourself. I have walked a mile (or stitched a few thousand yards of thread) in those shoes, and I am here to tell you that it isn't as easy as they make it look! For allover designs you set the design and let the machine do its job. To custom quilt you have to create designs, resize, define then crop either inside or outside of an area, reposition start and stop places and use other features that I haven't even attempted. I wouldn't say it is difficult, but it is technically precise and challenging. The learning curve is steep. Especially if you take my route and experiment rather than watching the educational videos. Skipping that important information was probably a mistake!
Monday, March 7, 2022
Welcome to UFO Week!
Last week, the addition of new shelves in my wholesale department required moving, sorting and finding another home for several items. (The "wholesale department" is the closet where I store the patterns that I sell to quilt shops, who eventually sell those patterns to you.) When I move one thing in my sewing area it sets off an avalanche of other moves. The result was the unearthing of several more projects that were added to my UFO pile. I decided that something had to be done and the time is now. I have officially deemed this week as UFO Week.
I began sifting through the pile, sorting the tops that need to be quilted from those that need borders and the quilted pieces that only need bindings. I ended up with another pile that needs something... I'm not sure what it is that they need, but something has prevented me from thinking that the top is finished. That something is the reason the project landed in the UFO pile.
I started to wonder. What is the difference between a UFO and WIP? Quilters like to use cute terms and abbreviations to label their work. WIP stands for Work In Progress. Aren't all unfinished projects works in progress? Admittedly some progress is slow... very slow, but when do you decide there will be no more progress? Why is it that some unfinished projects have hope as a WIP and others are banished to the corner or back of the closet as a UFO? WIP projects are like those leftovers that you wrap and place in the frig with good intensions of using them for something tasty. Then they get moved to the back, behind the things you use daily. The next thing you know they are a UFO weeks old and headed for the trash. What happened to the potential they had? What keeps a WIP from being banished to the bottom of the UFO bin?
With my Handi Quilter cleared of the latest project and not yet piled with stacks of deadline projects, I have decided to dedicate at least a part of each day toward making a dent in that UFO pile. The tops that are simply waiting to be quilted is the easiest place to start.
UFO Week, Project #1:
Project: Easy Street Quilt
Requires: To be quilted and bound.
The reason it is a UFO: This one is more of a WIP. It is not quite 2 years old. It is the sample featured on my Easy Street pattern that features the Straight Out Of Line ruler by Karla Alexander for Creative Grids. Once the project photo is taken, I don't need to finish the project unless I want to show it off. I will be vending at the quilt show in Jacksonville, Florida in September, so now is the perfect time to finish this project. The REAL reason it is a UFO is that after assembling the blocks and taking the photo I noticed that the random arrangement of the blocks, wasn't as random as I originally thought. Two blocks featuring the monkey print are facing the same way in the top row. I set the quilt top aside, intending to take one of those blocks out and rotate it 90 degrees and put it back in before quilting the quilt. Months later, those two blocks don't bother me anymore. This is a baby quilt. Will the baby that uses this quilt care about those monkeys that face the same way? I doubt it. Will that child not get into Harvard because their baby quilt had a block that may have looked better facing a different direction. I think not. I know for a fact that no baby will every enjoy using this quilt if it stays in my UFO pile. Done is better than perfect.
Progress: I have lots and lots of fabric in my sewing room so finding a backing for this project was easy. It is not the perfect shade of green, but in my effort to save the life of a UFO, a fun backing is better than none. I loaded it onto my Handy Quilter Amara.
Next, I had to choose a thread color and quilting pattern. I normally quilt with 50 wt. embroidery thread for one single reason. I own a TON of it. I have almost every color imaginable, so why not use it? For this project I had the skimpy spool of the perfect color or the much larger spool of the "ok color". I decided to play it safe and go with the ok color! Running out of thread would certainly dampen my enthusiasm for finishing this project.
My longarm is computerized so quilting is as simple as selecting the design you want and telling the machine the size of your quilt. The computer makes the magic happen. For this project I chose a curved design that looks like a monkey wrench to me. There are monkeys on the fabric, so it seemed like a good choice. While the Amara was doing its thing, I searched out a length of the border fabric that was cut from the edge of another quilt long ago. It was more than enough to make the binding for this project. (Side note: That border and binding fabric are a texture print that I designed many years ago for Timeless Treasures Fabrics. I created the texture by doing a layered Crayola rubbing on the front of my refrigerator!)
When the quilting machine was finished stitching the allover design, I trimmed and then stitched the binding in place. I like to finish bindings by hand stitching the binding on the back of the quilt, but this quilt got the stitch in the ditch by machine finish. FINISHED - that feels good!
Day one of UFO week was very productive!
Why don't you join me and celebrate UFO Week by finishing up a few of your own UFO's?
Friday, February 25, 2022
Pixies & Petals
This post is going to be out of line. Straight Out of Line. That is the name of the ruler, designed by Karla Alexander, that I used for my latest Jaftex challenge. If you read this blog regularly, you know that as a Brand Ambassador for Jaftex, I receive a mystery bag of fabric about every other month. My job is to make something wonderful. I love the challenge! It is a lot like the TV program Chopped, but with fabric and a month-long time limit.
The FedEx bundle was waiting for me when I arrived home from Sewposium. It took a few days to recover from an exhausting week of wrangling 60 quilt shop owners, tossing around ideas and making plans with them for the upcoming year. Once I caught up on lost sleep, I opened the package to find Pixies and Petals by Salt Meadown Designs for Henry Glass Fabrics. These cuties brightened my sewing room and reminded me of our granddaughter Madeline.
Thinking of her reminded me of the stop motion software that she received for Christmas and had downloaded on to my iPad. A quick trip to Target to buy a doll to star in my show and some training from Madeline and I created this unboxing video. TOO much fun!
flying across the blocks. I chose to make the center of the quilt in a checkerboard pattern, alternating the assorted fabrics from the collection with a white-on-white print.
Finishing a project with Cuddle or Minky type fabric has its own set of issues that need to be considered. I added a layer of white pre-washed flannel as the batting. You don't really need a batting layer when using plush fabric on the back. I used the flannel to keep the purple backing from shadowing through the white-on-white fabrics on the front of the quilt. All three layers were loaded on the quilting machine and lavender dragonflies joined the pixie party.
Stitching the cotton binding in place is a slow process and requires far more pins than I like to use. Once the binding has been stitched on the back, I have a trick I use to keep it in place while I top stitch it by machine. Pellon EZ-Steam in the 1/4" width. I fuse this tape to the seam allowance. When you remove the paper backing, the surface is sticky. You can finger press your binding in place, and it will stick. The fusible isn't permanent until you iron the binding. After everything is tacked down and my mitered corners are perfect, I machine stitch, very close to the edge of the binding. This trick also works if you like to wrap your binding to the back and stitch in-the-ditch on the front of the quilt.
Saturday, January 22, 2022
BITS & VERY SMALL PIECES
I have never been very good at "crumb quilting". It has been suggested that I should just do it and see how freeing that process can be. I disagree. In my mind, you have to consider size, scale of print, color, style and proportion to create something that is pleasing to the eye. I have also been told that I am bossy and a control freak.
Creative, Designer/Bossy, Control Freak. It is a mess inside my brain. I am a living breathing oxymoron. I design the Scrap Crazy Template Sets for Creative Grids, but I like my scrap quilts organized and easy on the eye. There is nothing wrong with piecing quilts with every fabric under the sun. I am amazed at the wild and crazy work of others, but I can't duplicate that kind of freedom in my own sewing.
That brings us to this piece of work. Those are the trimmed bits from the scrappy version of my Partial Credit pattern. Those scrap units were within reach as I was piecing a totally different project. I used them as "thread bunnies" or small scraps to stitch on so that something was always under my needle. When I completed a section of the quilt, I stitched two random pieces together and left them under my needle while I pressed the pieces for the main quilt. One thing led to another, and I started trimming the units and piecing the pieces. I have no idea what this will eventually become, but I do know I will love it when it is finished. I realized that I could crumb quilt with pleasing results if I organize my crumbs the way I organize the fabrics for my quilts. They were right, the process is extremely fun.Then I happened to come across a Facebook post by Pat Sloan. Pat saved all the scraps and trimmed pieces from every project she made in 2021. She wanted to see if she could use those scraps and how much fabric was actually left from projects. I am sure that Pat sews as much, if not more, than I do. The scraps that are generated from a year of sewing are equal to several large quilts! The control freak side of my brain would never allow me to create the wonky blocks that Pat generated, but I will say I was inspired! I found that red/white block in the photo above very intriguing. I gave myself the afternoon off to experiment.
We have talked about this bin before. It contains all of what I call my Kim Diel style fabrics. Both of the quilts shown were made with the fabric from that bin. Several table runners and a few placemats came from there too. The bin is still full, but many of the pieces were slivers, chunks and leftover 2.5" squares that needed to go either into the trash or into a treasure. I decided to try for treasure.I hope you are inspired to do a little crumb quilting of your own. Fabric is expensive. You pay for every bit of fabric that goes into your quilt. You pay the same amount for all of the fabric that is leftover. Make those leftovers into a treasure! Have some fun!
Tuesday, December 7, 2021
BEE Finished!
Dare I say that I have been "busy as a bee"? I have finished the lap quilt from the Bee You line from Henry Glass & Co fabrics. It was so much fun to work on these cute little prints.
I am very happy with the black background floral print as my setting triangles. It is a nice contrast to the other softer color prints. It also allowed me to "extend" the black into the border so that I could make a larger quilt. I did sneak in that darker shade of yellow that is not part of the fabric line, to add a bit of variety and coordinate with the darker yellow in the background print. I always think that adding another fabric adds a bit of "life" to the project and makes the fabric group shine.
This project really spoke to my mantra "It is all in having the right tools". I used the Creative Grids Hexagon Trim Tool to cut the hexi and half hexi shapes. You need to partner that with the 60 degree triangle for the background triangles. In place of the triangle ruler, I used the "A" template from the 6" Scrap Crazy Template Set. It is also a sixty degree triangle and it is the perfect size to work with the 8" finished hexagons. Clipping all three corners on those setting triangles made the pieces go together perfectly. I was concerned about the rows matching up, but a generous spray of sizing before I cut and the geometry built into the rulers, and those points are perfect! I do mean perfect! There are a few hundred points in that quilt and there are only a few that are off by a single stitch. As my Grandmother would say "A blind man would be glad to see those"!
I will admit that the differential feed on my BERNINA 770 was extremely helpful in bringing those points together. Once again, it is all about having the right tools.
I cut two identical pieces of border print, about 18" long. Between those I stitched what would be the equivalent of a fat quarter of the tossed hexagon print. Press the seams and you are done! I added the runner to the Handi Quilter to use up the extra backing fabric. I reduced the scale of the butterfly quilting design and let the Handi Quilter do its thing. A little black binding on both pieces closed the book on these projects.