Saturday, April 15, 2023
Tricks and More Tricks
Friday, March 24, 2023
Harder Than it Looks
One of my favorite parts of working with Jaftex as a Brand Ambassador is the creative challenge. They send a package of fabric about every 6 weeks and my job is to make it into something wonderful. The last Jaftex project I completed was using Beachy Keen by Janelle Falk for Blank Quilting. For that fabric line I created two projects. This beach ball table runner will be featured on social media. This is patterned after my Beach Ball Runner from the Scrap Crazy for More book using the 6" templates that I designed for Creative Grids.
When I finish the quilt, the fun begins. I look for interesting places all around the little town on our island to take the style shots. I shop for props that match or coordinate and start planning the photos.
For Beachy Keen, I had a crazy idea for a photo. Wouldn't be awsome to toss the quilt at the waters edge and then take a video of the beautiful white water rolling over it? Then I could reverse the video and run it in slow motion. The result would look like the ocean was receding and revealing the quilt! Totally cool eye-candy for social media! I convinced my husband to be my quilt wrangler. His job was to get the quilt in position, timing the waves and make sure that it didn't wash out to sea! Off to the beach we went on a chilly and a what turned out to be a bit too windy of a day.
It's the Little Things That Make My Day.
Earlier this month I stopped into Cinnamons Quilt Shop in Jacksonville Florida and I picked up a copy of the All Florida Shop Hop magazine. I absolutely love this idea! From what I have seen, the two women that run the state wide program are doing a top-notch job of organization, promotion, marketing and making a difference in the quilting industry. I have heard good things from consumers, participating shops and the vendors that support them. Their plan is to cover the entire US, state-by-state or by region. If your state doesn't have a hop, there will be a hop coming to your area in the future.
I'm not sure that I will be hopping to many stores during the event, but I did want a copy of the magazine so that I can check-out the quilt shops as my husband and I travel around the state. You never know when a road trip might need a detour for a fabric fix ;).
I was flipping through the magazine and came across this:
It made my day!
In addition to the shop listings, the magazine features seven quilt patterns. This particular quilt caught my eye. Then I checked out the "recommended tools". That's my Perfect Rectangle Ruler! If you are a veteran of the Brown Bag Mystery, then you already know that the Perfect Rectangle Ruler is one of the rulers that we used for the 2022 Brown Bag Mystery quilt. You probably already own one!
It might seem silly, but I get excited when other designers use my tools.
If you are a Brown Bag Mystery veteran that is chomping at the bit for the next clue, why don't you order the magazine from a Florida shop and put that Perfect Rectangle to work on another project? I would bet that Cinnamons in Jacksonville, or Boutique 4 Quilters in Melbourn, or Cotton Patch in University Park would be more than happy to help.
Friday, December 2, 2022
It's the Little Things
Sunday, September 25, 2022
By Annie, By Karen
You are about to hear the tale of my very first By Annie bag. It is hard to believe that with all of the samples I have made over the years, and the popularity of the By Annie patterns, this is my first attempt at making one of Annie's wonderful bags. What was I waiting for?
Evidently, I needed a push. Jafex provided a gentle nudge in the Brand Ambassador program by way of a challenge. We had the opportunity to select one of Annie's patterns and Jaftex provided the fabrics. It doesn't get any easier than that!
The goodies from By Annie arrived before the fabrics, so I was guessing that mine would be bright and colorful. I received both pink and green zippers and pink mesh for an interior pocket as well as the hardware and Soft and Stable for my bag.
Then the Tropical Vibes fabric line by Emma Leach for Blank Quilting arrived and those colorful zippers made sense. I immediately decided to "go green" with the toucan print, green zippers, ferns for trim and planned the larger toucan print for a fun lining.
After skimming through the pattern, I had some second thoughts. (It is ALWAYS a good idea to read the entire pattern before starting your project). The toucan prints are directional. As a By Annie beginner, I didn't want to risk having a directional print run sideways! I opted to "test" the pattern using the multi directional flamingos instead.
Because I was convinced I was making a "test" bag, I decided to use the panel print from the fabric line on the back of the quilted fabric that you create for the bag. I pinned everything into my longarm and quilted away. Annie suggest a grid quilting, but I don't own a computerized long arm to do straight lines, so I chose one of my favorite designs. It was my first time quilting with Soft and Stable, the foam type of batting, on my longarm. It quilted like butter! I was impressed! I cut out my pieces and "sealed" the edges as instructed. Then I made the carrying strap with the shoulder pad. That piece is made with several layers of quilted foam and has binding around the edge. I decided if I could be happy with my workmanship on that piece, the rest of the bag would be easy. Cheating, just a little, I made the entire piece out of the accent fabric. My thought was if the binding was a bit wonky, it would be harder to see those issues with matching rather than contrasting fabrics. The shoulder pad came out PERFECT - with the help of one of Annie's free videos. I was so pleased - make that amazed - that I decide the flamingos would be "the bag" and no longer a "test".
I could have made the whole process easier on myself if I would have taken the time to watch the instructional videos on the Tutorials (byannie.com) website before I started this project. I also chose a pattern that includes two bags. The instructions are written as if you have made the first bag before starting the second. Naturally I chose to start with the second bag. That required a lot of flipping back and forth to read previous instructions. Once again, had I taken the time to READ the instructions and not just skim through the pattern, I may have made different decisions on how to approach this project and saved myself some aggravation.
I am happy to report that all is well that ends well. I finished the flamingo bag and I am thrilled with the results! These photos show the front of the bag with the zippered pocket and the back of the bag with the open pocket. The top of the bag zips closed with double zipper pulls. The mesh zipper pocket in inside the bag. I know that the giant flamingo from the panel print will make me smile everytime I open this bag. Choosing the panel for the lining makes this bag really fun! I may add something funky to every By Annie bag I make in the future, because I am sure this one will not be my last!
Friday, July 29, 2022
Anybody Gnome?
I just made the easiest quilt ever! It all started when FedEx dropped the latest package from Jaftex on my porch. I wasn't expecting a package, but I am always excited when a bundle of fabric shows up at my doorstep!
As soon as I opened it, without even checking the selvedge, I knew exactly who had designed it. I have been a fan of Leanne of The Whole Country Caboodle for years... probably decades. Her designs were the first fusible applique designs that I offered in my store. I never missed the opportunity to stop by her booth at International Quilt Market to see what was new.
Leanne's latest fabric line, along with her daughter Kaytlyn, is called "Gnome Town Heros" for Henry Glass Fabrics. The prints feature a variety of gnomes in the rolls of nurse, police officer, teacher, engineer, even artist (who isn't afraid to color outside the lines) and quilter! The gnomes are in multiple sizes. There is even one fabric panel that is large enough to make into stuffed dolls. Another is printed so that it can be stitched into a soft book. I chose to use the book panel as feature squares in a toddler size quilt.
With an idea, but no real plan, I started by trimming each of the fabric book pages to a square. (Those printed squares are never really square so you have to play around to find the size that works). It turned out that 6 1/4" was the best choice. A bit of an odd size, but that wouldn't be a problem. I planned to use a few of the coordinates from the line to tilt the blocks using the Perfect Rectangle Ruler. Once that was done, I could trim them to a more standard size. After adding a half rectangle to each side, I found I could trim the blocks to 10 inches. Using the Perfect Rectangle Ruler, tilts the blocks rather than putting them on point. It looks a little more casual and adding the companion fabrics makes the featured blocks stand out.
I chose to use 9 of the 12 pages to make tilted squares, but I wanted to end up with a rectangular quilt. That's when the fun began! I decided on 3 vertical columns for this quilt. All I had to do was add rectangles of the other prints that were 10" wide and any height. As long as I added identical size rectangles in each of the three columns, everything would fit together. How easy is that! No pattern needed.
Each column would have 3 tilted blocks, alternating the direction of the tilt. (To change the direction, cut the triangles with the fabric face down.) Then I added a strip of the border stripe to each column. I cut the strip, including seam allowance on the top and bottom. The height didn't matter, as long as all three segments were trimmed to 10" long.
Next I added the tossed print with the vehicles to each row. That is a super cute print, so I added two pieces! Then I decided it needed a little more red, so I cut narrower strips of that print. All of this happened on my design wall, where I could rearrange the pieces, shifting them to keep the color moving around the quilt. The grey prints were beginning to blend together. I decided on some narrow black Jot Dot strips to break those areas up. Column 2 needed those black strips, but that meant they had to be added to columns 1 and 3 as well. A little rearranging and I the columns were ready to be stitched together. How long is each column? It doesn't matter. I simply added pieces until it "looked about right".
The three columns were each 10" wide and would finish at 9 1/2". That would make this toddler size quilt only 28 1/2" wide. Time to add some vertical sashing. I decided on 2" finished sashing between the pieces columns and 3" finished border around the outside edge.
The quilt top went together so quickly, that I decided to finish the project right away. By making sure that the width of the quilt stayed below 40", I could use one width of fabric for backing. (That works ONLY because I do my own quilting. Most longarm quilters want a minimum of 4+" of extra backing on each side of your quilt top. Nothing wrong with that.... but it is possible to squeek by with less width. I never reccomend skimping on length.) I had random widths of fabric left, so I stitched them together to form a striped backing. I popped it on the longarm and let the ProStitcher do its thing. I love that machine. #HandiQuilterAmara.
Two piece machine binding was sewn together, and pressed while my HandiQuilter was working hard. The quilt came off the machine and I trimmed it using my 20.5" Creative Grids square. Once again, having the right tools makes any job so much easier. First I pinned and then stitched the binding to the back of the quilt. Then I folded it around to the front and stitched the binding in place by machine on the tiny grey flange.
This was such a fun project, no rules, the right tools, fun fabrics and everything fell into place. Give it a try! Now that it is complete, I know the perfect little person to give it some love. It's all yours Jack!
Thursday, June 2, 2022
Wilderness Trail
My latest Jaftex Challenge definitely qualifies as a challenge. As a Brand Ambassador, I was convinced that the next bundle of fabric goodness from Jaftex would contain Christmas fabric. The style might be traditional, or it might be novelty, but it would most assuredly be red and green. The calendar might say spring, but this is the height of the holiday season in the fabric world. I was so confident in my prediction that I believe I was even humming Jingle Bells when I opened the package. Wrong.
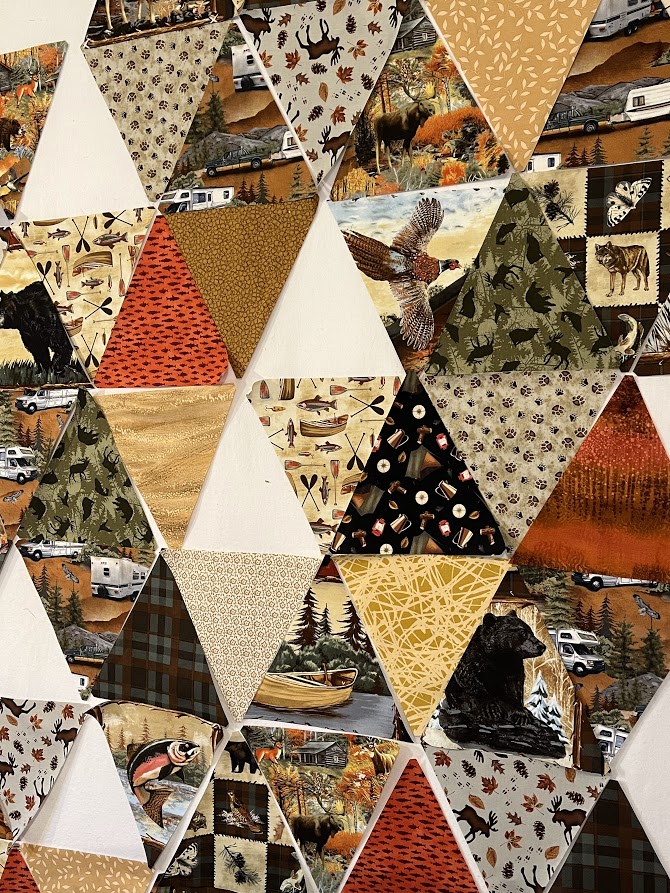
My new fabric challenge is Wilderness Trail by Ed Wargo for Blank Quilting. I have to admit that it threw me for a loop. I was prepared for out-of-season Christmas sewing. I was not expecting a different out of season and north woods prints! Moose, bear, log cabins, campers, fish and wolves howling at the moon are not my normal go-to style of fabric. This is also the fabric bundle that I am to use for the Brand Ambassador Summer Challenge. We have been asked to choose a pattern from the Home Decor section of the Jaftex sponsored, Sew it Yourself website for our next project.
The Sew It Yourself website https://siysewityourself.com/ is packed with fun projects that are FREE for you to download. You should check it out!
I had originally chosen the Emblem Pillows as my project. After the fabric arrived it was obvious that the large-scale prints were not suited for pillows. I opted for the Symone Quilt instead. Choosing the quilt made perfect sense. It uses the triangle in a square shape and the half rectangle. I happen to design those rulers for Creative Grids. The pattern provides templates or suggests using the Wonder Triangles or Tri Rec tools. Obviously, I would be using the Creative Grids tools that are the same shape, only larger.
The pattern is written for fat quarters, so I cut my bundle into fat quarters and decided to make the pattern exactly as written, except for the change in ruler brands. Super easy. Just follow the instructions. Except....
The triangles in the pattern are 6" finished. Some of the fabric prints are LARGE in the Wilderness Trail fabric line. It isn't easy fitting a moose in a 6" triangle. No problem. Luckily, I have larger size rulers, so I decided to make my triangles 8". I will make the quilt exactly the same as the pattern, except the triangles will be larger.
After cutting all of the fabrics into triangles and fussy cutting the larger shapes from both the panel and the pillow panel squares, I separated the triangles into lights and darks. I chose to start the layout with all of the light triangles pointing down and the darker ones pointing up.
It quickly became obvious that the Wilderness Trail prints could use some "breathing room". I went to my scrap basket and cut some neutral triangles that read more solid to give your eye someplace to rest. Then I filled in with the triangles that featured an image. All of those were inserted so the image was right side up. That helped me in the assembly process. If I became confused as to where I was in a row, it was easy to figure out because none of the animals should be standing on their heads! I was making the quilt exactly like the pattern, except for the size of the triangles and the addition of many more fabrics.
One of the Wilderness Trail fabrics is orange. Having only a few large orange triangles really made them stand out. Back to the scrap basket I went, where I chose another orange print to help move the color around the quilt top. That really helped, but it still needed something. It needed more orange, but not large areas. I wanted it sprinkled around the quilt. The only way to achieve that was to make large triangles out of smaller triangles. Super easy! Four smaller triangles make one large triangle. My triangles finished at 8" so I would need smaller ones that finished at 4". I cut the 4.5" triangles from scraps. A slight modification to the pattern that I was following exactly, except for the size difference, the number of fabrics used and the additional piecing.
I was ready to sew everything together when I realized that the printed pattern had seven rows. That means that unlike the top row, the triangles in the bottom row have seams that begin/end at the very corner of the quilt top. This quilt does not have a border, and I would rather not add bulk to the corner for binding. I did have some extra triangles..... I added another row to the bottom of my quilt. Very easy to do and just a small change to the instructions that I was following exactly.
Here it is! My Wilderness Trail version of the Symone Quilt, only slightly larger (48" by 64" instead of 36" by 42") with slightly more fabrics (13 prints + scraps instead of the suggested 10) with a bit of extra piecing tossed in. Hmmm.... do you think I should add a border?


.jpg)