Wednesday, June 23, 2021

Star of the Show


    Ready to finish those cork coasters?

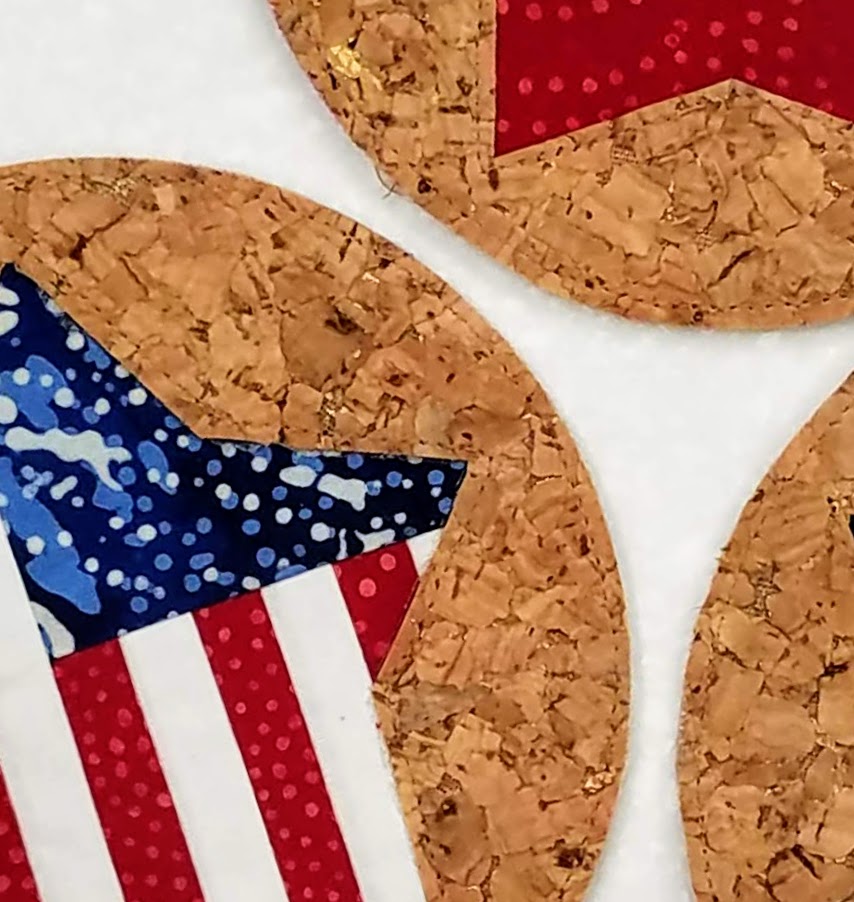
    You don't really need to foundation paper piece the fabric layer.  Any fun fabric will make a cute coaster!  I made 2 with flags, one red one and one blue one.

    You will need cork, a craft knife, scraps of Steam-a-Seam2 and thread to match your cork.  You will also need a circle shape that measures about 4 1/2" to cut the cork and pattern for the star.  I used my Creative Girds Circle Templates and an old CD for the circle template and I drew the star.  If you have problems drawing a star, Google "star clipart" and download one.  Then trim it to measure about 4" or any size that fits well inside your cork circle.


Step 1.  Working on your cutting mat, use your craft knife to cut out two circles for each coaster.  I used an old CD for my cork pattern.  
Yes that is a "vintage" CD.  Do kids today even know what "dial-up" means?


Use your star template to draw the shape on the back of one of the cork pieces.  Use your craft knife to cut out the shape.  Don't limit yourself to stars.  Get creative!  If you are having a card party, why not make coasters and cut the shapes in diamonds, spades, hearts and clubs?


Apply a piece of Steam-a-Seam2 to the back of your fabric layer following the manufacturer's instructions.  Add a few scraps of the Steam-a-Seam2 to the back of the cork cutout too.  
The Steam-a-Seam2 is sticky, like a post-it and will hold the layers together while you stitch.
Trim your fabric layer slightly smaller than the cork circle.  I used my circle templates for this because the CD is slightly larger than 4 1/2" so the circle cut with the template fit perfectly inside.


Layer the fabric face up on the back of the solid cork circle and press in place with an iron.
Place the cutout on top of the fabric and align the edges.  Press in place.
Top stitch around the outer edge and around the star shape using thread to match the cork.
That is all there is too it!

Tuesday, June 22, 2021

It's a Grand Old Flag

Grab a beverage, this post is going to be longer than usual!

    A few nights ago I woke up around 3am, thinking about coasters.  The kind of coasters that go under your drink, not the kind with thrills and hills.
    Do not ask me why coasters were so important at 3am.  I have no idea why my brain works the way it does.  I do know that isn't unusual for me to wake up in the middle of the night and lay awake mentally working through the step-by-step process of sewing something together.
    Because the 4th of July is just around the corner, I thought a flag project would be a perfect coaster.  I mentally paper pieced the flag part - no problem there.  It was how to finish the edges that kept me awake until after 5am.
     I didn't want to turn them under. I didn't want to add a binding.  Pinked edges seemed too informal.  In the wee hours I finally decided that cork might work and promptly went back to sleep.
    Oddly enough, I can explain the cork process in just a few steps - and I will in another post.  But first you have to foundation paper piece the flag and that explanation is going to take some effort. 

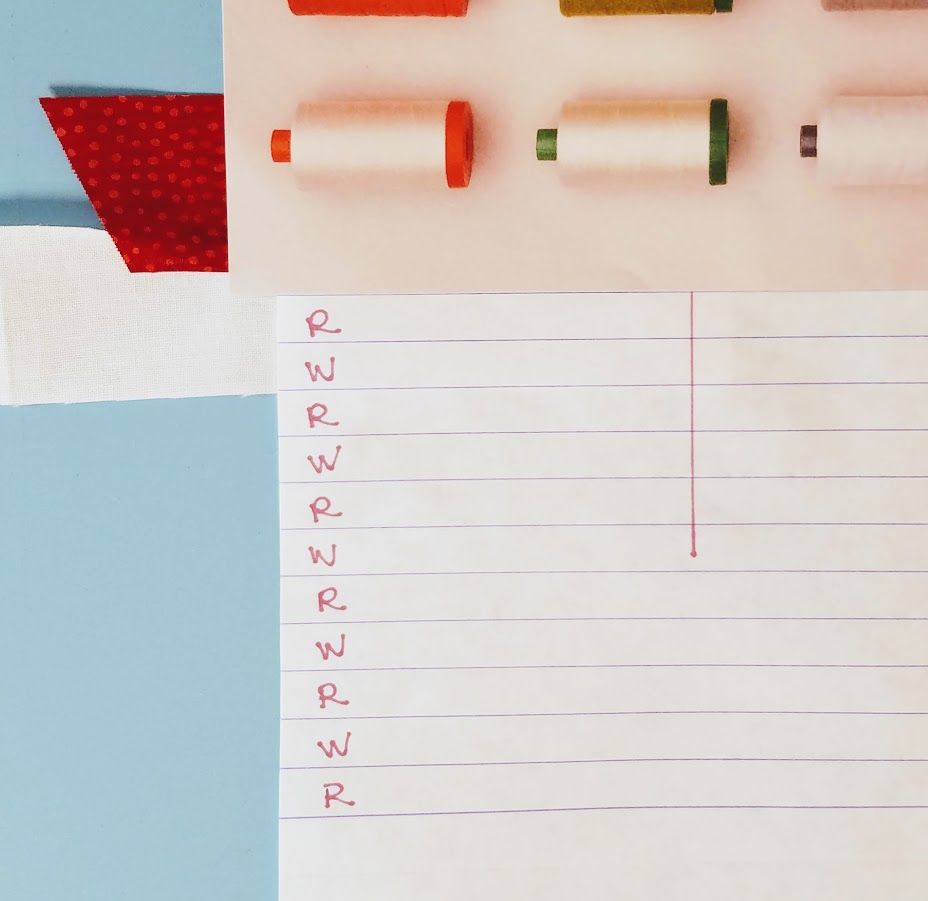
    Step 1.  Draft the pattern.  You can do this!  The U.S, flag is mostly stripes, so the easiest way to make the pattern is to use a piece of notebook paper.  The stripes are built in!  Cut a square about 5 1/2" square.  
    The flag has 13 stripes, so mark off 13 rows and mark the rows, alternating Red and White on the left side of the paper.  You should begin and end with red.  Those 13 stripes should measure around 4 1/2". 
    Next measure in from the left side 3" and draw a vertical line from the top of the page down past the top 8 rows.
    That is it, your pattern is finished!  
    Time to grab some red, white and blue fabric scraps.  Choose a white that is as opaque as possible.  You don't want to see those red threads shadowing through.  I cut the strips 1 1/4", which is REALLY generous, but I would rather trim than scrimp.  I cut the blue square 3 1/2".  Once again, SUPER generous, but better too much than too little.  After all, we are working with scraps!

    Step 2.  The process is called foundation paper piecing.  You will be working upside down and backwards.  This means that you will have fabric on the bottom and your paper pattern will be covering it up.  Trust me, it works!  Turn the paper pattern over.  You will be placing the fabric on the back.

    Place one strip of red so that it covers the top right corner, all of the top red stripe and most of the 2nd stripe that is white.  The fabric strip should span from about 1/4" over that vertical line on the left to off the paper on the right.  This strip should be right side up.  I used batiks, so it is difficult to tell the right side from the wrong side.
 
    Now place a strip of white, face down, on top of that red strip.  I nudge that white strip a tiny bit over the red fabric, just to make sure the red doesn't show through the white later.

    BEFORE YOU SEW, thread your machine with white top and bobbin thread and REDUCE YOUR STITCH LENGTH - a lot.
    I reduce my stitch length to 1.0.  That puts a ton of stitches in each inch.  Those stitches perforate the paper so that it is very easy to remove when the block is complete.  The bad news is, if you make a mistake, you have a TON of stitches to rip out!  
    Hold the fabrics in place as you gently turn the paper over and slide it into your machine.  I use a presser foot with a center mark so that it is easy to follow the printed line.  
    

    You are ready to sew on the line between the top red row and the second white row.  You should see the fabric extending into the row marked white.  
    Your stitching should be tiny stitches, directly on the line printed on the paper. 


      Turn the unit over, fabric side up.  Open the fabrics and press either with an iron or a wooden press bar.  You can trim any excess fabric that extends on the right hand side beyond the paper pattern


    Turn the unit over, paper side up.  This is where I use a stiff piece of cardstock.  I happen to have the ad for Aurifil Thread handy and it worked perfectly.  For short seams a postcard or any stiff paper will work well.  It helps to have a firm edge to fold the paper against.

    Align the paper with the printed line at the BOTTOM of the white stripe.  This is where your next stitching line will be.  That is where you want to FOLD the paper.  Fold the paper back, over the cardstock to reveal the fabric underneath.  


    Now you can trim the excess fabric.  Make sure that you TRIM  1/4" from the fold to allow for seam allowance.  You DO NOT want to trim ON the printed line, you want to trim 1/4" past the printed line where you will sew.


    Unfold the paper, set the cardstock aside and turn the unit fabric side up.  Place another strip of red fabric on top of the white, having the right sides together.

    Hold the fabric in place as you turn the unit over and stitch on the second line, at the bottom of the white stripe.

    Repeat.  Continue adding fabric strips, folding the paper back, trimming and pressing until you have added four red and three white stripes.

    You have been adding stripes to the left side of the paper pattern.  When the fabric side is face up, the stripes are on the right, where they should be.  This is what I meant by upside down and backwards!

    The next step is to add the blue section.  I used a 3 1/2" square of fabric.  Most of that will be cut off and end up in the trash.  One thing you learn when foundation paper piecing is that too big is much better than too small!  Don't skimp!


Before adding the blue square, gently pull the paper away from the fabric.  Use the cardstock to help you fold the paper on the vertical line and trim the excess fabric to create a nice clean edge.  Don't forget to leave the 1/4" seam allowance in place!


    Place the blue square on top of the red and white stripes having the right sides together and one edge even with the trimmed edge toward the center of the paper.  The blue square should extend all the way to the bottom of the last red stripe.  Stitch in place by sewing on the vertical line you drew in step 1.


    Flip the unit over.  Open the blue fabric square and press.  
It is starting to look like a flag!

    Time to trim the bottom edge and add the next white stripe.  This stripe will extend all the way across the pattern. 

    Keep going!  Sew, fold, trim, press, until all of the stripes have been added.


This is important!  
    To make the coasters we will be trimming the flag into a circle. 
I want you to understand how to finish trimming, just incase you want to make your flag into a square or rectangle.
    The left and right edges can be trimmed even with the edge of the paper or they can be trimmed 1/4" away, depending on your desired seam allowance.
    The top and bottom edge MUST be trimmed 1/4" ABOVE and BELOW the line printed on the paper.  That adds the seam allowance to the top and bottom stripes!


 Now you can remove the paper!  Simply peel it away.


    To make the coasters we will be trimming the flag into a 4 1/2" circle.  I have the set of Creative Grids Circle Templates to use.  If you don't own circle templates, look around the house for something 4 1/2" round.  Find an old CD if you can.  Gather up those, your cork and a craft knife and I will post the instructions for assembling the coasters in my next blog post. 

Saturday, June 19, 2021

The Expanding Quilt


     I love the FedEx delivery person.  We have never met, but when my doorbell rings and nobody is there, I always find a wonderful surprise that has been left for me on my doorstep.  

    Earlier this month a package with these beauties arrived.  This fabric line is Scarlet Stitches and White Linen by Color Principal, from Henry Glass Fabrics.

     As part of my Brand Ambassador duties for Jaftex I receive a package every few weeks.  The package always includes cuts of one of their not-yet-released fabric lines.  This bundle also included several spools of Aurifil thread!  How lucky can a girl get?  It is my responsibility to make those fabrics into something beautiful that will show off the fabrics and hopefully have you running to your local quilt shop to buy the fabrics so that you can do the same.

        I always like to check out the FREE pattern on the fabric company website before I begin.  I want to make sure that whatever I design is totally different than what is already available.  The free project for Scarlet Stitches and White Linen is absolutely beautiful!  It was designed by Heidi Pridemore and it features the panel print in those center squares.  You can download this pattern from the Henry Glass website by clicking here:  FREE PATTERN  The free project is large and complicated, so I decided mine should be small and simple.  The group is red/white/grey but the grey has a blue tint.  I just happen to have a bolt - yes a whole bolt - of a Henry Glass basic in the perfect shade of light blue.  I also decided that the pieces should be large so that you can tell the prints apart.  I had 10 fabrics to work with, 5 dark background and 5 light background.  Instant checkerboard!

    Some quick computer work and I had a plan!  Six large light background blocks surrounded by dark background blocks with connector blocks using that addition of blue.  I had to be careful about the fabric placement in those connector blocks but that would be easy.  Except.....


Once I had those pieces on my design wall I liked this project, a lot.  I had plenty of fabric, so why not make a few more blocks?  The simple six blocks became twelve.  


The "small and simple" plan went out the window.  All of those connector blocks were already made to match the fabrics on all 4 sides.  I went back to the computer, then graph paper and it was more than a bit of frustration.  It was worth it, because this project deserved to be a larger quilt.  The quilt looked great on my design wall.  But, I still had fabric left......


Then twelve became twenty!
Back to the drawing board once again.  My goal was to plan the placement of the fabrics in relationship to the connector blocks so that I didn't have to rip or remake any of those connectors.  It worked!  It took every last inch of fabric, but I was able to make it happen.  I am very happy with this much, much larger than originally planned quilt.

    
 The quilt has an understated Americana look and is perfect for display on all of the summer holidays.  Special thanks to Chris, my neighbor across the street, for the loan of his front porch for this pix.


Friday, June 18, 2021

Branding

    In between my regular design and sample sewing responsibilities I have been a busy Brand Ambassador for Jaftex in the last few weeks.  I truly enjoy a creative challenge, so getting a package of fabric in the mail and deciding what to make with it can be a really fun puzzle.  It is important that the project show off the fabric. The project(s) also have to be completed in a reasonably short period of time.  And I have a limited amount of fabric to work with.  Cue the Mission Impossible theme....

      A few weeks ago this bundle of fall goodies show up on my doorstep.  Hello Fall from Henry Glass includes lots of small prints, light backgrounds and warm toasty colors.  I immediately set the center of the panel print aside for a table runner project.  It will be part of the Holiday Fun Bundle that you will hear all about later this summer.  

    I decided these prints would be perfect for smaller projects rather than a large quilt.  One of the fun parts of this Brand Ambassador gig is that I don't have to write instructions for the projects I make.  I can use a printed pattern, write a new one or simply make it up as I go along.

    I decided to start with a few "make it up" placemats.  You truly do not need a pattern for this project.  Simply start with the feature square (cut from the panel)  and sew and flip strips around it in an interesting pattern.  I choose to iron the backing to a rectangle of fusible fleece batting so that my "sew and flip" is also "quilt as you go".  Setting the feature square off to the side, gives it a more creative look than placing it dead in the center.  One of the busy prints with the light background made a perfect backing and hid all of the starts and stops in my quilting lines.  I made two, because I have two bar stools at our kitchen counter, so these will be perfect this fall.

    I needed to make more than just two easy placemats from this group, so I used part of the border stripe to decorate a tea towel.  Another of the panel pieces was used to make a hot pad including extra layers of batting and the heat resistant silver fabric for the backing.


    With one cute pumpkin block left, I decided to make a Four Square Placemat using one of my $2.50 patterns.  No binding, no hand sewing.  I used the same fusible fleece batting from Pellon that I always use in my placemats and table runners.  I really like the rounded corners on this one! 

    Then it was time to take the photos that you see here.  I pulled out props, ran to the store for some fresh baked goods, and did my best to make my house at the beach look like fall in the middle of May.  Photo shoots are crazy days around here.  I make a heck of a mess, but at least my husband was happy eating the leftover props!  Hello Fall should be in stores by the time you are reading this. - Enjoy!   


Saturday, February 13, 2021

Makin' it Easy

    Everyone loves to get something for free.  That is why fabric companies offer a free pattern for almost every fabric line produced.  Simply visit their website and download the instructions at absolutely no cost to you.  Then hopefully you will buy the featured line of fabric and put that free pattern to use.  

    A free pattern is not a gift, it is a sales tool.  I fall strictly on the side of "You get what you pay for" in the free pattern discussion.  I frequently warn people to look closely before beginning one of those projects.  If the image of the quilt was created digitally, as in on the computer, beware.  I can draw lots of designs on my laptop that you would go crazy trying to sew.  It is entirely possible that the free pattern you snagged off the internet was created by someone that doesn't even sew.  Reputable companies have technical editors that write and/or review the instructions before offering them to the public.  It is still a good idea to look things over before you get too deep into a project.

    Take the Whimsy Daisical line from Blank Quilting, the free pattern on their website is adorable.  You can download the pattern here: whimsy-daisical-quilt. I have some leftover fabric from the Straight Out Of Line quilt, so I decided to check out the pattern and see if I could make a fun summer table runner using just three of the blocks in the quilt.

    I printed the pattern and did a quick read through of the materials and the instructions.  The first thing I noticed is that the materials list includes paper backed fusible web to bond the melon shapes to the background squares.  The list doesn't tell you how much you will need, it just says you need it.  That makes sense because the fabric company doesn't promote a specific brand of fusible, so they don't know how wide the one you choose will be.  Remember, these instructions are free,

    Those flower shapes made from the melons are surrounded by half square rectangles.  The instructions tell you to foundation paper piece those.  Simply make 48 copies of the foundation page.  For this project that method is easy to write and doesn't require a special tool, once again, free pattern.

    I'm a big proponent of having the right tool for the job, so I filmed a video showing how you would make those units using their method, and how you can make them using the right tool.  The tool is the Perfect Rectangle Ruler that I designed for Creative Grids.  Faster, easier, less waste, and no bias edges. You can watch the video on YouTube by clicking here: Half Square Rectangles.

    As long as I was set up, I filmed another video about the fusible process for the melon shapes.  I made a table runner, but the full size quilt requires 48 of the melons.  The instructions are basic, they tell you to trace the pattern on to the paper side of the fusible web.  What are the odds that you can trace 48 identical shapes?  Me too.  In the video you will see how easy it is to make a template.  Click here to watch the Fusible Applique video.

    I finished the series with the Machine Applique to discuss the difference between a machine zig-zag and a satin stitch.  The pattern suggests a zig-zag with a monofilament thread.  Most of us refer to it as "invisible".  There is nothing wrong with those instructions.  If I have to stitch around an applique, I prefer that the stitching shows.  I chose a tiny machine blanket stitch for my melon shapes.  I also used a fuchsia embroidery thread, just for fun.

    I made a few changes to the block to create my runner.  The center section measures 12".  The half square rectangles add another 6".  The block, without the sashing used in the quilt pattern, measures 18".  That is plenty wide enough for my kitchen island, so I omitted the sashing and stitched the segments together without sashing.
    That made it very important that the melons meet in the center.  I was glad that I had used the blanket stitch and not a heavy satin stitch.  The corners are bulky enough without all that added thread.  If you give this a try and aren't happy with that intersection, add a fun button to look like a flower center.  I had some purple ones on hand, just in case! 


I joined the three large blocks side-by-side, once again omitting the narrow sashing.  Then there was nothing left but quilting and binding.  I have a Handi Quilter with a ProStitcher so quilting wasn't a problem.  I selected an all over daisy pattern that came programmed into the machine.  The backing is white, because my counter top is white.  I didn't want to put a print on the back and risk having it shadow through the white background in the blocks.  The binding is a sold yellow/orange that came from my vast fabric stash.  Here is a photo of the runner on my island.  Not exactly a Valentine theme, but it adds a little pink to my kitchen for the holiday this weekend. Happy Valentine's Day to all of you!  
Enjoy!

Monday, February 8, 2021


    Have you ever been "in the zone" when you are quilting?  Your rotary blade is sharp, your points match, your pieces are square and flat when pressed.  Your thread lasts until the end of the seam and everyone in your household allows you the time to simply create.  Best of all, you love what you are working on.  Ahhh.... Total enjoyment.  That describes the last five days in my sewing room.  It has been absolute bliss.  I hate to even mention how well things are going and risk of conjuring up the wrath of broken needles, dull blades and seams that don't match up.


     In anticipation of a package of sample fabric from Jaftex, I started to play with a Creative Grid's ruler called Straight Out Of Line.  This isn't a new ruler.    Karla Alexander of  Saginaw Street Quilt Company designed this ruler several years ago.  I just decided that now was the perfect time to play with it and see what happens.  After all, not all of the really cool tools are brand new on the market.  I think we have all rushed to buy a "hot" new item only to have it fizzle.

     You may be looking at the simple shape of this ruler and thinking "Do I really need a ruler to do that angle line"?  The answer is absolutely not.  You don't "need" a ruler to make these blocks.  If you like your seams to match and your pieces to lay flat and your quilting process to be enjoyable, then you probably "want" the proper tool to do the job.  This one is also simply fun to play with. 
 
     First things first when playing with a new tool, you should read and follow the directions.  I know, that is a hard one for me too.  I generally like to jump way ahead in the design process. I trust Karla, so I decided to watch the video for this ruler on the Creative Grids website.  If you watch the video by going to the website instead of YouTube, scroll down to see the quilt patterns that Karla has available to use with this ruler.  

     My first thought was to grab some fabric!  It can't be that easy... but it is.  A few hours later this small top was together and on my design wall.  It is a funky four patch, one of the basic things you can make.  Super easy.  I used twelve 10" squares from a Tula Pink fabric pack.  The most difficult part is keeping track of where the 90 degree outside corners are on the cut pieces.  I solved that problem by making a paper pattern of the shape to help me stay organized.


     I still had squares of that Tula fabric leftover, so I decided to see what would happen if I cut half of them right side up and half of them right side down.  Adding twelve blue squares cut from yardage to the mix gave me not only a larger quilt top, but it also accentuates the checkerboard pattern.  Notice how in the first quilt only the center seams of the blocks match.  In this quilt all of the seams line-up.  Karla shows how to flip the ruler over to get the mirror image cuts in the video.  I prefer to simply flip the fabric over.  It works either way.

     My head was filled with ideas when FedEx delivered the package of Whimsy Daisical fabrics from Blank Quilting.  All these funky fun colors to play with!  If these prints don't spark joy in your life and make you smile, you might need to seek professional help.  

     Enough of following Karla's lead, it was time to have some fun of my own with the Straight Out Of Line ruler!  I have a huge bin of fabric scraps that could be labeled "It was a good idea at the time".  Most of  my "good ideas" start out as "I wonder if this will work" ideas.  Some do, some don't.  I took the time to play with scrap fabrics, sizes and color placement before cutting into the sample yardage from Blank.  You should never be afraid to make a test block - or two - or three so see if things are going to look the way you want, even if you are working with a published pattern.  

     After a bit of experimenting with size, I decided to cut half of the blocks at 10" and half of the blocks at 8".  Then I added a narrow border of white to make the smaller blocks measure 10" before cutting them with Karla's ruler.  Ten inches is the largest size square you can use with The Straight Out Of Line ruler, but it also includes the lines to use squares as small as 4 inches.  It would be fun to use this ruler to cut up a charm pack.  

     I cut all of my squares for the quilt, making the first cut face up and the second cut with the fabric face down.  Did you notice that gave me two different shapes?  The blocks in the first two quilts have four identical shapes.  The blocks for the Whimsy quilt have 2 different shapes.  This is not my discovery, those instructions come with the ruler.  I just added the blocks with the border to the mix.

     Look how much fun I had with this quilt!  You can look at these blocks for a long time and see different things.  I like the way it looks as if the background blocks are fractured.  Do you see butterfly wings?  Maybe you see kites?  Know what?  Those thin white borders lined up from block-to-block every single time.  Every.  Single.  Time.  That folks is what having the right tool for the job can do for you.  

     If you love this fabric line, it will be available in a quilt shop near you in the next few weeks.  If you would like to see something else  - totally different - using these same fabrics, check out the free pattern from Blank by clicking on the Whimsy Daiscal link above.  Then check back here later and I will show you how to make that free download quilt using the proper tools to make the job much easier.  Meanwhile - keep sewing!

Friday, January 15, 2021

Sew Sweet

     Here is a fun little project if you are looking for a way to show someone some love.  Grab your fabric scraps, a small piece of thin batting and a couple of 5" squares.  If you have some ribbon or trim scraps or some fun buttons, bring those along too.  

     You don't need anything special for this project, although I do love my pinking shears for finishing off a raw edge.  If you have a pair, pull them out and dust them off.  You are going to appreciate having them.

     Other than the fabrics and optional trims, you will only need a sheet of paper and your basic quilting supplies.

     Step 1 is to make a small piece of patchwork that measures 4 1/2", raw edge to raw edge.  I chose to cut 1 1/2" squares.  To make the block I needed 16 squares.  I stitched them together in four rows of 4 squares each in random order.  You could create a checkerboard pattern using only 2 fabrics.  You could use random size strips instead of squares.  The goal is to ENJOY the process.  I think that helps build the love into this project.

     The next step is to layer the patchwork block with a thin layer of batting and backing.  A 5" square is perfect for the backing.  It should be face-down with the batting on top and then the patchwork face-up on top of the batting to create your mini quilt sandwich.

     Now you are ready to quilt!  This is an important step.  It is the details that you put into a project that take it from being something that has that "dorky homemade" look to being a gift with special meaning.  

     I did some simple crosshatch quilting by stitching diagonally corner-to-corner through the squares.  Keep in mind that the squares on the outside edge have 1/4" seam allowance remaining, so the true corner of the square is NOT the edge of the fabric.  It is 1/4" inside that edge.

     I use my walking foot for the quilting, but this piece is so small that you won't need to.  Give the quilt sandwich a quick press with your steam iron and the layers will cling together for you.

     Now you can create your heart template.  You learned to do this in kindergarten.  Start with a 4" square of paper.  Fold it in half diagonally.  Starting at the folded edge, cut a half of a heart shape using your paper scissors.  Unfold.  TA DA!  If you hate it, cut another one.  Use the entire piece of paper to make your heart.  It should measure a tiny bit less than 4".

     Using your removable fabric marking pencil, draw your heart shape on the patchwork side of your heart.  You should have approximately 1/4" of fabric extending on all sides.  I use a Frixion pen that disappears with heat.  

     To finish this as a simple heart, top-stitch on the heart outline and then trim.  This is where I use my pinking shears to create a cute edge.  If you don't have pinking shears, you can simply trim approximately 1/4" from the stitching line.

     I like to add a pocket to the back of the heart so that I can tuck in a note or gift card.  To add the pocket, fold a 5" square in half diagonally with the right side showing.  Place the folded piece on the back of the quilted patchwork, having the raw edges even.  Check to make sure that the pocket is at the pointed end of the heart and that the folded edge is at lease1/4" below the "V" in the heart.  Then stitch on the heart outline.  The outline stitch will secure your pocket in place.  Trim with pinking shears through all layers.


Add a simple bow by tacking the ribbon in place and then tying the bow.  Trim the ends.  If you plan to add beads or buttons by machine, add those to the patchwork layer before adding the pocket or you will stitch the pocket closed!  Remember to keep any hard embellishments well away from the machine stitching line.


There is nothing left to do but give your heart away to someone you love!