Sunday, July 19, 2020

Happy H Day!

     
     Most of you already know that although I now live in Florida, I'm a Pittsburgh girl at heart.  Today, July 19th 2020 I'm celebrating the 109th anniversary of the Pittsburgh "H".  Way, way, way back when the city was named, "Pittsburgh" was chosen to honor William Pitt.  However, the actual selection of the name was made by a Scotsman, General Forbes.  To his way of thinking it made sense to add the "h" to the end, as in Edinburgh.  
     The story doesn't end there.  In 1891, due to a paperwork snafus' official documents were recorded without the "h" at the end and Pittsburgh became Pittsburg.  From 1891 until 1911 the US government spelled the cities name one way and the city government spelled it another.  Finally 109 years ago on July 19th 1911 the US Geographic Board voted to reinstate the "h" and Pittsburgh got it's "h" back.  Let's party!

For this project you are going to need:
24 strips 2 1/2" by the width of the fabric, you can cut these yourself or use part of a jelly roll.
1/2 yard of background fabric or 6 strips 2 1/2".
3/4 yard of fabric for the inner border and binding.
2 1/4 yards of border fabric if you want a larger quilt."


     Begin by cutting all 24 of your strips into the segments shown below.  Keep the strips folded.  Working from left to right, remove the selvedge edge.  Cut 2 segments 6 1/2" long.  Cut the remainder of the strip into 2 1/2" squares.  Normally I would never ask you to cut across the fold, but for this project if you get just one more square from the strip you will have exactly what you need for the project.  If your strips were cut wonky, you might need to grab some fabric from your stash to make up the extra blocks for the pieced border.

     Now cut the 6 strips of background fabric into 96 background squares measuring 2 1/2".  There are 48 blocks in this quilt and you are going to need 2 background squares for each block.

     Each H block has 2 rectangles and 1 square cut from the same fabric.  By following the cutting diagram above you will be making 2 identical blocks from each strip.  The remaining 2 1/2" squares make the pieced border, set these aside.  Select 2 squares from each strip and stitch a background square to opposite sides.  Use a 1/4" seam allowance.  Don't make the mistake of sewing a background square to ALL of the 2 1/2" squares. 
     Now sew a 2 1/2" by 6 1/2" rectangle to each side of your pieced unit.  One H block complete!  Press the seams toward the darker fabric in the center section and toward the rectangles on the outer edge.  These blocks will measure 6 1/2" including seam allowance.  Make a total of 48.

     Once your blocks are complete, arrange them in 8 rows of 6 blocks each, alternating the direction of the H.  I prefer to sew 6 vertical columns of 8 blocks each.  That results in fewer long seams.  Standard instructions are usually written in horizontal rows, but I prefer columns.  Try it!  You might like it too.

     From the inner border and binding fabric cut 5 strips 1 1/2" for the inner border.  Stitch these together end-to-end to form one long strip.  My preference is to seam on a 45 degree angle, but these are very narrow strips so if you are more comfortable with straight cuts, those are fine too. 

     Now, measure the length of your quilt top and cut 2 strips to that size.  I'm not going to tell you how long to cut this strip.  You have to measure.  It's not because I don't know the answer, it's because your seam allowance may be slightly larger or smaller than mine so your strip length will differ.  ALWAYS cut your borders to fit YOUR quilt top.  Stitch these to the right and left side.  Press the seams toward the border strip.  Now measure the width, including the borders you just added.  Cut two more strips to that length and add them to the top and bottom.

     At this point you can simply add nice wide borders and be finished with this top.  BUT if you want you can use the remaining pieces from the 2 1/2" strips to piece another border.  Cut a strip or two from the inner border and binding fabric to add to the corners for interest.  Stitch the number of squares together needed for side borders, adding the left and right and then add the top and bottom.  You will need 25 squares for the left and right and 21 squares for the top and bottom.
Approximately 42" by 54"

          Now it's time for the big finish!  Adding a nice wide border not only enlarges your quilt it acts as a frame for your work.  I cut my border strips 8 1/2" wide.  That will make your finished quilt approximately 58" by 70".  The reason I cut them 8 1/2" wide is that my favorite long ruler from Creative Grids is 8 1/2" by 24 1/2".  You can cut yours any width you like.  

     There you have it, a little history on the Pittsburgh H and a free pattern to boot!  Although I illustrated this in 'burgh black and gold, it looks great in any color.  It is also a great pattern to use with scraps by making each piece a different fabric, you won't see the H.  Enjoy!


Thursday, July 16, 2020

Clean Your Iron Day!

     It's Official.  

     Today has been dedicated to clean irons everywhere.  It doesn't matter what day you are reading this.  Take a few minutes to appreciate your iron and give it a good cleaning.  I have a wonderful Rowenta Steam system.  Yesterday I looked at it, I mean really looked at it, instead of just looking at the fabric I was ironing.  The poor thing should have sued me for neglect.  Not only did it need to be emptied, rinsed and have the sole plate cleaned, it needed a bath!  
     I use lots of spray sizing and the side and top of the iron were covered in overspray.  It was time to give one of my favorite tools a little tender loving care.  This particular iron has a huge water tank as well as a plug to clean out those scale flakes that accumulate.  It really is a fabulous iron.  If you are in the market for a new one, I suggest that you consider making an investment in this one.


     You will rarely hear me suggest a shopping trip to JoAnn Fabrics, but in the case of this iron, that is exactly where I purchase it.  But not until it was on sale.  Sometime between Thanksgiving and Christmas this model is deeply discounted, but they don't included it in the sale flier.  As a designer, I have wholesale accounts and can order items at cost.  This iron was cheaper on sale.  The regular price is $299.  I got mine for around $189 and it has been worth every penny.  This exact model is on sale at Sur LaTable.com right now for $199. 

     You will see some negative reviews for this model because the name of this iron is the "compact" steam system.  It is definitely not compact.  The water tank is large enough to hold 1.2L of water.  That's a lot of steam when you are pressing seams or preshrinking fabric.  The white button on the side allows you to empty the tank of any "gunk" that accumulates.  No extra filters are needed. 

     Over the last 18 months this iron has grown to be one of the notions in my sewing room that I don't want to live without.  It falls into the same category as my Koala Sewing Chair and my Stella Lights.  These are big budget items (Koala Chair, retail $399, Stella Light $189) that make working in my sewing room so enjoyable.  I've always believed that you can do anything if you have the right tools.  Although I could certainly make a quilt while sitting on a kitchen chair and pressing with a $19 iron, I'm worth the investment - and so are you! 

     Obviously I love my sewing machines and my longarm, but these three items make my sewing life more fun, so that I want to sew even more.  I invested in them after lots of research and chose wisely.  Now I'm letting all of you know how happy I am with them to hopefully take some of the risk out of your buying decisions.

     What are the items in your sewing room that you wouldn't want to live without?  Are there products that you would like to highly recommend to others?  Leave a comment here or post one on the Friends of The Quilt Company Facebook page.  If you aren't a member of our private page, send a friend request and I will be happy to approve you ASAP!  Happy Sewing!

Sunday, July 12, 2020

Public Service Annoucement


     I've had a fabric bag for microwaving potatoes for years.   At first I was skeptical of the whole thing, but at the shop we sold thousands of kits to make them so I gave one a try.  Those bags work!  I've made several for family and friends and everyone loves them.  It really makes a difference in the texture of a baked potato that is cooked in a microwave.


     The bag is a bit damp after use, so I usually just let it dry out and pop it back in the drawer.  The next-to-the-last time I used it, dinner also included barbeque sauce.  Evidently some sauce ended up on the fabric potato bag that I didn't notice. The LAST time I used it that sauce got hot - really hot and caught the bag on fire!  I started those potatoes and walked back to my sewing room where I left my phone.  Luckily I didn't get distracted and returned to the kitchen to see my potatoes and bag in flames.


     I know there are stories about bags catching fire because metallic fabric was used or the wrong kind of batting was inside.  This was a well used bag.  It had zapped dozens and dozens of potatoes.  I can only assume that the sweet barbeque sauce was the culprit.  So this is my helpful hint in the form of a public service announcement:

WASH YOUR POTATO BAG

  If you don't have a potato bag, you should.  Below is a link to a video and printable instructions.  Just be sure to use cotton fabric (no metalic, cotton thread and cotton batting) and remember to wash the bag after use.  Guess what I am sewing today?


Friday, June 5, 2020

Adding Spice to your Kitchen

     My apologies for those of you that have remodeled your kitchens during the white cabinet craze.  Your kitchen is about to be officially out of style.  I know this because the countertops in MY white kitchen were installed yesterday.  Our pandemic delayed kitchen remodel is finally nearing the end.  Only details like baseboards and decorating are left to finish. Very shortly, and I can only assume it will be mere hours, HGTV will declare white cabinets "dated".  Brushed nickel fixtures will become woefully out of style and simply have to be replaced before a house can be sold.  The color grey will be out, out, out.  I'm confident in this prediction because I'm an HGTV junkie.  Every single time I have seen something I own appear on one of their programs, it simply HAS to GO.  Sorry HGTV, I'm loving my new space no matter what the pros profess to be in style.


    This is a photo of my almost complete kitchen.  What I like best about it, besides the fact that it is spotless is that it is the perfect backdrop for pops of color. (The truth is the faucet wasn't installed and the cooktop wasn't wired in yet in this photo, so I couldn't mess it up)  I can change the look by changing the placemats and wall hangings.  That blank wall by the door is screaming for a quilted wall hanging.  The island is going to look marvelous with an 7' runner for a holiday buffet.  The coffee nook that doesn't show in this photo has no upper cabinets offering even more space for quilted artwork.  

      I think I will start my decorating with this Easy Striped Runner. This one is made from a fabric from Timeless Treasures and it features jars of seashells.  The beach theme is perfect until I stitch up something special in red, white and blue for the 4th of July.  

     If you follow the Friends of The Quilt Company on Facebook, you already know I have LOTS of Easy Striped Runners to choose from.  (If you aren't in our private Facebook group, send a friend request to Friends of The Quilt Company and I will friend you right back.)

A few weeks ago in that Facebook group I asked for opinions on the cover for the new Anniversary Edition of the Easy Striped Table Runner pattern.  These were the choices, 1, 2 and 3:
     After over 100 votes, the favorite was split almost equally between #1 and #3.  Guess what?  We are printing #2.  The powers that be (my distributors and other shop owners) feel #2 stands out, shows the entire runner and is the most different from the original.  Different is important, because even if you own the original pattern, you might want the Anniversary Edition too.  The new version includes how to use the larger stripes, how to create placemats, how to use only triangles and tips for selecting fabrics for specific designs.  All of these options are included in the new pattern:
     You should be able to find the Anniversary Edition of the pattern in a quilt shop near you.  If you can't find it locally, you can order a copy from my Etsy shop by clicking HERE. The price is $9 and the shipping is FREE!

Monday, April 27, 2020

CHECK YOUR DNA


                     I have never taken one of those DNA tests like 23 and Me, but I am fairly confident that if I did it would come back saying that I am part squirrel.  I feel that must be true because the synonyms for squirrel are store, hoard, and collector.  I don't think I am in danger of being featured on an A&E program like Hoarders, but I do have a large "collection".  If you asked me what I collect, I would have to say the answer is fabric scraps.
               To be considered a “collector” you must gather from a variety of sources.  I certainly generate scraps from my own assortment of projects, and I curate them from friends.  I have also stood in a 10,000 sq. ft. quilt shop that is owned by a good friend and been offered anything off the shelf.  I turn down that offer in exchange for a garbage bag of scraps.  It is those odd pieces that hold so much promise.  Scrap quilts fascinate me.  To make them the way I like to see them made, with coordinated scraps, you absolutely must become a collector.  Justification for my obsession.

Hoard seems like a severe term in reference to my fabric collection.  After all I do USE those pieces to earn a living.  To be truthful I also must admit that I hold on to some of those pieces, refusing to use them.  Because if I did, they would be gone.  I once owned a shoebox clearly marked “Scraps – Too Small to Use”.  If that means I have a problem, I can live with that. 
Something had to be done to get my scraps in order.  Quick reality check: If this is your sewing space, we probably can't be friends.  Too much organization stifles my creativity.


This week I tackled the storage part of my squirrel issues.  I don't know how you store your collection.  I have always enjoyed wallowing in mine.  Previously I owned a huge basket into which all fabric pieces were tossed.  When starting a scrap project, I would dump a mound of fabric on the floor, surround myself and start sorting until the piles inspired me.  It is wonderfully creative, but not very efficient.  Especially for an easily distracted squirrel.  Ohh, look at that…..

With every nook and cranny exploding with pieces of fabric, I decided to tackle the batiks first.  After a few hours of sorting and a hefty investment in small laundry baskets, these gems now live under my Amara.  Aren’t they beautiful?  Before you start questioning my definition of “scrap” any fat quarter with a piece cut from it constitutes a scrap in my book.  Really small pieces are in a mixed basket under my sewing table.  I also chose to use baskets instead of bins with lids because I work with fabric every single day.  I did not want them stored, I wanted them accessible. 

The blue quilt in the photo that is ready to be loaded into my Amara is made with my Crazier Eights templates using Debbie Maddy’s Shibori fabric line from Moda.  It could have been made from 10” squares, but it really was made from scraps.  I actually bought the scraps from Debbie instead of buying a layer cake to make the quilt! 
The plan is to add another row of baskets behind the batiks and duplicate the sorting of regular cotton fabrics.  I will add additional baskets for Christmas scraps and novelty prints at some point.  Right now I can’t wait to play with those batiks!


Thursday, April 16, 2020

A Series of Unfortunate Events

     We move last summer.  We now live in a different house in a different state, but what I mean by "moved" is that WE literally transported everything we own.  My husband is a do-it-yourself kind of guy.  He is also considered crazy by many.  That doesn't bother him, nor stop him from doing things the way he sees fit.  Today his can-do attitude came in very handy.

     The story begins with the moving of my sewing room.  Because the move was made over several months, almost everything was transported in our mini van.  Including my BERNINA 880.  The top of the line BERNINA machine with a retail price of $14,999.  THAT machine.  I placed my mega machine on the garage floor, without a case, ready to be packed in the van. (It has a soft cover, but I have never actually put the machine away, so I have never even opened the cover.)  I sew every single day if possible.  My thought was, who needs a cover?
     That's when "it" happened.  I won't mention who was carrying the ladder through the garage and turned to tell me something when WHAM.  Right into the screen.  See those cracks?  That's bad, very, very bad.  I loaded the machine for moving and wasn't overly concerned because I know enough about BERNINA to know it could be fixed.  I would just take it to the nearest dealer.  Except I no longer live anywhere near a BERNINA dealer.
     No problem. When we had The Quilt Company, I was a dealer.  Our son was our Machine Tech.  I just needed to order the part.  
    Our son came to visit and left - without fixing the machine because I kept forgetting to ask my dealer friend, several states away, to order the part for me. I finally remembered and the new screen arrived in February.  Just in time for the stay at home order.  Our son lives in Pennsylvania.  We live in Florida.
     I thought I could wait.  What's a few more weeks?  No problem..... really..... I don't mind..... except that I really do.  I miss my embroidery machine.  Especially now that this shelter in place order is lingering on, and on, and on.  So today, my husband decided to fix it for me.  
This is important:

DO NOT TRY THIS AT HOME!

     Have you ever seen the inside of your sewing machine?  It's a scary place in there!
That photo isn't even as complicated as the 880!

     Armed with the new screen, assorted screw drivers (actual BERNINA tools) and our son on a video chat.  We carefully removed the case..... It was like one of those movies where a doctor talks someone through a complex operation so that the patient can live.  I know I was holding MY breath!
     Brandon, who has the patients of a saint, carefully explained the step-by-step process while watching his Dad's fingers do the work via my phone.  (Full disclosure: My husband did attend a BERNINA Tech training when we became dealers, but that pre-dates the 880).  I feel it is important to repeat:

DO NOT TRY THIS AT HOME!
     It was touch and go for a few minutes, but
She is BACK!  
The operation was a success! I am a happy, happy girl.

The moral of this story is:  Respect both your machine and your dealer.  Treat them both with care.  You might not have a can-do husband with enough professional training to understand the instructions provided by a certified technician.  You might not be lucky enough to have given birth to a certified technician that is willing to stay on the phone for 2+ hours for free, because he wants his Mom to be happy. If that isn't your situation, rest assured that not protecting your machine will cost you a pretty penny and the tech doing your work, will earn every bit of that fee.

Saturday, April 11, 2020

SOMETHING FROM NOTHING


Admit it.  
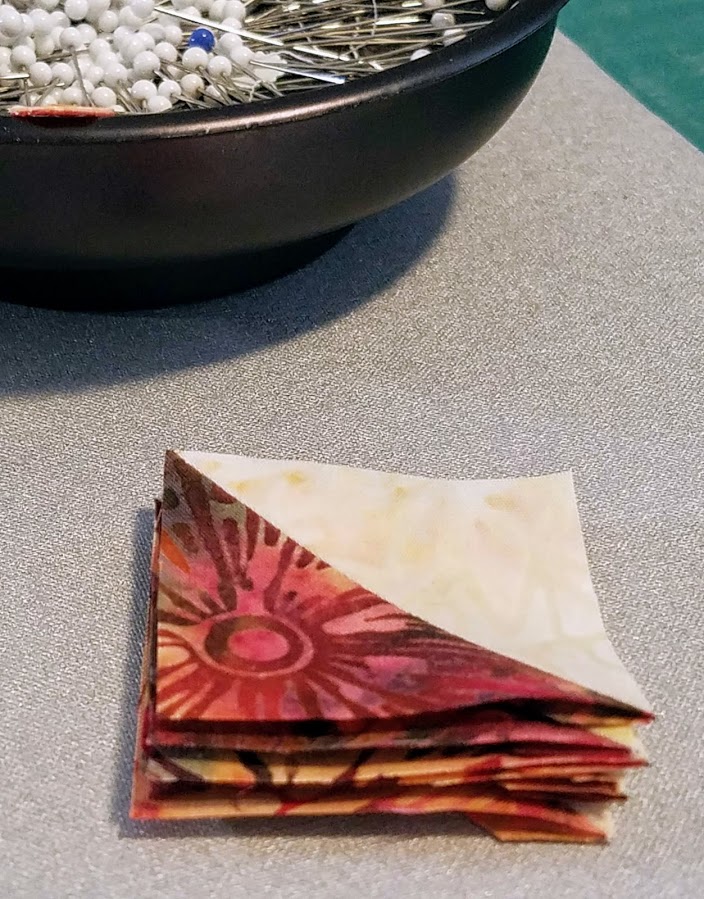
You have a pile of small triangles stacked somewhere in your sewing space that were the result of a clipped corner project.  There is something about those little triangles that keeps you from tossing them in the trash.  They are already paired together.  You have an entire stack of them.... 
they could BE something.
Today is their day!

Let's turn those clipped corners
into
THIS!

14" Carpenter's Star pillow

The half square triangle are going to be made from those corner clips that were considered trash.

Sew them together and press the seam open.
Now square them up to measure 1 1/2"
to make a finished block that will measure 8".
Make 32 of these.

Arrange the solid squares with the half square triangles to form the Carpenter's Star pattern.
You can work from this diagram or email me at Karen@thequiltcompany.com and put 
CStar in the subject line and I will email you this as a .pdf that you can print.
I placed my pieces on a 12 1/2" square ruler so that I could keep them in order as 
I moved from my sewing machine to my ironing board.
 (My iron is across the room so that I get SOME exercise!)

I chose to use the "web" method to keep this block in order as I assembled it.
I'm not normally a fan of that method, but for this 8" finished block it worked well.

To web the block, chain stitch the squares together in four vertical columns.
The web is created because you don't snip the threads between the pieces before adding the next column of squares.  I chose to make 4 columns of 2 squares.  Then stitch those together in pairs.  Then stitch the two halves together to complete the vertical web.
See how all of the units stay connected with a few stitches 
in-between each pair.


Then sew the pairs together, then the halves, 
with out snipping the joining threads.

Press all of the seams open.
These squares finish at 1".  
Open seams will distribute the bulk and allow the block to lay flat.

Repeat the web process to stitch the horizontal rows without snipping the original web.
Press the seams open.
The back of your block should look something like this.

To finish the block into a 14" pillow you will need:

1/2 yard of fabric for the outer border and backing.
1/8 yard or scraps for the inner border.
15" square of batting
14" pillow form
18" zipper (optional)

From the 1/2 yard of backing and border fabric cut 1 strip 3" by the width of the fabric.
From the remaining section of backing fabric cut 2 strips 3" by the narrow width of the fabric. 
(The short way).

From the inner border fabric cut 2 strips 8 1/2" by 1 1/2" and 
two strips 10 1/2" by 1 1/2"

Add the borders to the completed block.
(You know how to do this.)
Repeat the process 
using the 3" strips cut from the backing fabric.
Now layer the pillow top with the batting and perform the ever popular,
 "quilt as desired" portion of the instructions.

I outlined the inner and outer star about 1/8" from the edge.
I added a straight line in the inner border and a few more in the outer border using matching thread.

Rather than a fold over, sham type backing, I prefer a zipper in my pillows for several reasons.
1. Zippers stay closed.
2. You never have that gap that happens when the sham pulls apart.
I always think that looks like your slip is showing.
3. Zippers allow you to over stuff your pillow so that it doesn't look sad.
4. Pillows flatten with use, so if they don't start out full, things will only get worse.
(Here's a tip: Cut your pillow top the SIZE of your pillowform.  
Once the seam allowance is taken up, it's a bit smaller and you can stuff the pillow form inside.  
That will help fill the corners and make the pillow look better.)

However you have decided to make your backing, place the top and 
backing right sides together and trim to size. 
Stitch completely around the outside edge, backstitching at the corners and stress points.
Clip the corners to remove the bulk.
Turn the pillow right side out through the opening in the backing.
Insert the pillow form and ENJOY!

Now you have a Trash to Treasure!